Jump to content

NSD Neck Matt 1.0.0

   (0 reviews)

3 Screenshots

About This File

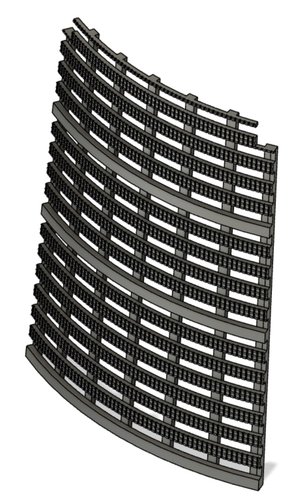
STL files to print replica pool matt for an NSD neck.  Modeled after actual pool matting used on my first NSD build, which was not authentic Heronrib/Heronair.  Just the closest equivalent I could find at the time.  Designed to glue into a 3D printed set of neck rings.  3 levels are designed smooth where they will mate to the neck rings to provide more surface for gluing.  You may need to trim here and there to fit your neck rings.

  • Like 4

User Feedback

Recommended Comments

DalekDucky

Posted

Outstanding work! Thank you sooooo much :) 


Just finished printing all of them and have them partially assembled in sections. Super glue on the tip of each end piece worked great.

Test fit within my rings  fits with no edit to the file.


Awesome work and just saved me a lot of $ to buy actual heronrib matting

ED7D37D5-4D7D-4DF2-9704-D456F05D6F2E.jpeg6DBFAAAE-92C5-4B2A-8140-8103BB586B19.jpeg


P.S. if you see a small gap in the "assembled" piece, it is not the print.
I still have not glued those parts. when assembled properly its a tight fit :)

  • Like 1
Link to comment
Share on other sites

Am i right in thinking that you have to print 8 sets of these to do the whole neck?

Link to comment
Share on other sites

Samantha Kayes

Posted

@John Am I able to rotate the image to fit flush on the build plate before slicing?, also what infill did you use??

Link to comment
Share on other sites

Samantha Kayes

Posted

@DalekDucky


I'm going to print this for my NSD until I can source the real thing.  Did you rotate the files so they sat flush to the print bed? and what infill did you use??

@elembivos

I'm going to print this for my NSD until I can source the real thing.  Did you rotate the files so they sat flush to the print bed? and what infill did you use??

Link to comment
Share on other sites

elembivos

Posted

@Thebiker22  Actually there are 8 panels.  The seams should join behind the uprights holding the rings together.


@Samantha Kayes When I open the model in Prusa Slicer it needs to be rotated 90 degrees to sit flat on the bed.  I haven't really figured out which orientation in Fusion 360 corresponds to upright in the Slicer.  I don't know what slicer you're using, but Prusa Slic3r also has a "Place on Face" button that will automatically orient a selected face down on the build plate.  You could use that too if you have that feature available.


I left the infill at the default, which was 20%.  There isn't much infill in these small parts though.  I'm not sure it matters.

  • Like 2
  • Love 1
Link to comment
Share on other sites

Join the conversation

You can post now and register later. If you have an account, sign in now to post with your account.

Guest
Add a comment...

×   Pasted as rich text.   Restore formatting

  Only 75 emoji are allowed.

×   Your link has been automatically embedded.   Display as a link instead

×   Your previous content has been restored.   Clear editor

×   You cannot paste images directly. Upload or insert images from URL.

×
×
  • Create New...

Important Information

By viewing this site you accept our terms, conditions and privacy policies.