-
Registration
Please register an account to access the Forum topics and features.
An Active Membership subscription gives you access to extra features and exclusive content!
Choosing Active Membership is a great way of supporting the community and showing your appreciation for our resources.
Please note that you need to register BEFORE you can use Facebook, Twitter or Google as a sign in method.
Files For 3D Printing
Files that can be used to for 3D printing physical versions, using your own printer or a service such as Shapeways etc.
Note that files for CNC and laser cutting can be found in their own sub-section, inside.
248 files
-
Free
Classic Eyeball
By Aaron J Climas
This is the front half of a classic style eyeball from the 60's. It's a slightly odd size hemisphere, and the 12 degree angle on the lip can be hard to get even.
So I have made a 3D print file, presented in both STL and OBJ format for people to print if they aren't so keen on making on themselves.
I haven't printed this item yet, but plan to later today. Although checking over the file there should be no major issues. It should fit perfectly flush with a 4" (102mm) hemisphere. It has 360 isoparms coming out across the body, so shouldn't suffer from not having enough resolution on the body.
Edit- I printed the file today, and it came out without a hitch. Although the model was 90 degrees out! Please give me a shout if you print this.
77 downloads
-
Free
Complete NSD Scale Model
By audrey2
All the parts for a scale NSD that can be printed and assembled.
The parts are designed to go together at a 1/5 scale, and while it may work in other scales I haven't tried them yet, so that's up to you to play around with.
You can see how I printed mine and put mine together when printed on a Replicator 2 here.
289 downloads
-
Free
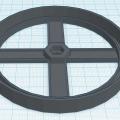
NSD Small Slat
By Ferrain
NSD Small Slat I designed & printed about a year ago. Slightly curved to fit, fill & sand (hopefully easier) to the shoulders.
More details Post 15.
162 downloads
(0 reviews)0 comments
Submitted
-
Free
NSD 2005 Oil Seal
By glynharper
This is my own design for an oil seal replacement.
It's not perfect, as the edges are a little faceted. Although I actually don't mind that myself as it appears more 'machine made' which I think suits a Dalek's appearance.
It incorporates an inner lip, in order to centrally locate your hemisphere. There is also a central part, which has a hole and a hexagon recess for a standard M6 head head bolt. This is to eliminate the requirement for MDF discs or other mounting methods to be stuck inside the hemis.
The idea is, but an M6 bolt through the hole (which is a tight fit to stop it dropping out.. tap it in if need be).
Then put a bead of black silicone in the recess of the oil seal and push the hemi into it. You can silicone inside as well, as there is access to do so.
The central supports are a ribbed structure, to stop the oil seal being able to be pulled away from the skirt easily.
Although the central recess will lock the M6 bolt in place, bear in mind it's still plastic so it will easily break if you put too much torque on the nuts you use to hold the oil seal on with. Best not to use lock nuts, but use normal nuts with spring washers, and some loctite. Nip them up, but don't over tighten them.
Would love some feedback, as this is my first design for a 3D printed Dalek part.
65 downloads
-

Free
Classic Dalek Pivot
By Ferrain
If printing the Genesis 5.5" Tapered Eye Stalk - The pivot should not be printed first in the event that the pivot insert shears & can't be refitted.
Print with a raft to allow ease of joining the halves.
PivotJan8FFV4.stl - Flat faced (no insert for eye stalk) with threaded bar channel - Choose this one if you have a eye stalk that will not fit into the 1" insert (or if the insert has sheared during the printing).
PivotJan8INSV4.stl - Insert 1" diameter 1.1cm depth hole to accommodate straight or tapered eye stalks.
Print the guide 4mm diameter pin for ease of assembling the two halves if required.
Print time on standard profile MB Replicator 2 should take about 2.5 - 3 hours & use 2.5 39g (0.09IIb) on standard quality print settings for each half.
114 downloads
(0 reviews)0 comments
Updated
-
Free
2005 Plunger
By elmoray
I wanted to give back to the group...
Here is a version of the 2005 plunger that I made for my Dalek. You can find more info on Thingiverse: http://www.thingiverse.com/thing:210939
318 downloads
-

Free
NSD Eyeball
By Slythenperior
This is my version of the 3d printable 2005 Dalek eyeball. The thing that makes this different is the screw function allowing the front of the eye and the back to screw together. This is in case something goes wrong with the wiring and the light stops working. Just thought it would make things easier for everyone. Enjoy
460 downloads
-

Free
Genesis Tapered Eyestalk
By Ferrain
Genesis Eyestalk TaperDec2
As above with 1cm insert into the next revision of the pivot, this insert should now be a solid piece compared to the previous version (should it shear away as per V1 it should fit back in & be pulled into place by the threaded rod as its tightened).
Genesis Eyestalk TaperDec3
As above .5cm insert into the first printed eye stalk spacer, this insert is smaller than originally planned as to fit on the printer bed of the Makerbot Replicator 2.
The pivot should not be printed first in the event that the pivot insert shears & can't be refitted.
ID of the threaded rod channel is approximately 1.62cm & this is to accommodate the 1.6cm diameter (approx) couplers for the 1.26mm threaded rod as used in my eye stalk design.
Print time on standard MB Replicator 2 should take about 2.5 hours & 40g (0.07IIbs).
Parts currently under (re) development to have a complete stalk assembly (add eye of your choice).
Pivot mounting.
Pivot with threaded rod channel or with threaded rod channel & insert guide hole.
1.2" diameter .75" long disc spacers with threaded rod channel & insert guide hole.
71 downloads
(0 reviews)0 comments
Updated
-
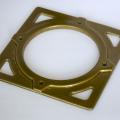
Free
300mm_ISD_Gun_Collar.skp
By Ferrain
This sketchup file produces a 3D model of a robust (chunky) classic gun rod collar when exported to STL & the 3D printer of your choice.
The reason I have uploaded it as a Sketchup file (in a zip format), is that if you select the whole model, then press , the model is surrounded by a cube which allows you to increase or decrease the overall model size, allowing you to tailor the inside diameter of the collar, to the outside diameter of the gun barrel.
It allows for about 5mm depth of support for a gun rod (once drilled out to suit your rods) to be affixed with epoxy resin of similar.
Earlier versions of the file produced one defective gun rod support - This model has extruded all pushed all the outer faces of the supports back into the main collar in a attempt to correct that defect. Should that not be the case, then I will create a new model when I get chance.
In HQ 0.1mm layer height & 5% infill it takes about 1.2 hours to print on a Makerbot Replicator 2.
39 downloads
-
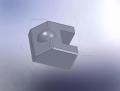
Free
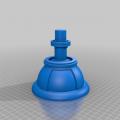
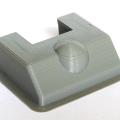
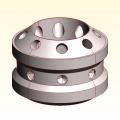
Pivot.STL
By Ferrain
Eye pivot
1" hole for eyestalk shaft
Smaller centered recess for threaded bar (drilling)
Slot for threaded bar nut.
Axle extends 1.6cm each side.
Hollow axle allows for threading power cables through the assembly into the threaded bar into the eye itself.
Not yet printed off, accompanying bracket still to be designed & printed.
84 downloads
-
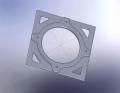
Free
NSD Gun Box Detail (FDM)
By DrJekyll
This NSD Gun Box Detail has been modeled for use with FDM printers, if you have access to SLS type printers you will be better off using Hallam's model.
I used Slic3r 0.9.9 to generate the gcode and printed it in PLA on my home built Mendel Prusa i2, with Sanguinololu electronics, Marlin firmware, and a J-Head hot end with the settings below.
; layer_height = 0.20
; perimeters = 2
; top_solid_layers = 5
; bottom_solid_layers = 0
; fill_density = 0.1
; perimeter_speed = 35
; infill_speed = 55
; travel_speed = 130
; nozzle_diameter = 0.35
; filament_diameter = 2.82
; extrusion_multiplier = 1
; perimeters extrusion width = 0.50mm
; infill extrusion width = 0.50mm
; solid infill extrusion width = 0.50mm
; top infill extrusion width = 0.50mm
; first layer extrusion width = 0.50mm
I also enabled Brim with a 4mm width. I should have made the brim wider as I got a bit of curling on the corners. I recommend you use a heated bed for this part.
To counteract the curling I placed the part on a disc of hardboard just bigger than the center hole. I them placed weights (cans of beans) on the corners and gently heated the part with a hair dryer until the corners dropped. They are now curling in the opposite direction which will not be a problem once bolted in place.
83 downloads
-
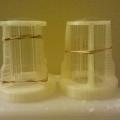
Free
NSD Neck Block (FDM)
By DrJekyll
This NSD Neck Block has been modeled for use with FDM printers, if you have access to SLS type printers you will be better off using Hallam's model.
I used Slic3r 0.9.9 to generate the gcode and printed it in PLA on my home built Mendel I2, with Sanguinololu electronics, Marlin firmware, and a J-Head hot end with the settings below.
; layer_height = 0.2
; perimeters = 2
; top_solid_layers = 5
; bottom_solid_layers = 0
; fill_density = 0.12
; perimeter_speed = 35
; infill_speed = 55
; travel_speed = 130
; nozzle_diameter = 0.35
; filament_diameter = 2.82
; extrusion_multiplier = 1
; perimeters extrusion width = 0.50mm
; infill extrusion width = 0.50mm
; solid infill extrusion width = 0.50mm
; top infill extrusion width = 0.50mm
; first layer extrusion width = 0.50mm
In addition to the Slic3r settings above I also lowered the layer height near the top to reduce the step effect.
Between 14.0mm and 15.3mm layer height was 0.15mm
Between 15.3mm and 16.3mm layer height was 0.10mm
Between 16.3mm and 17.1mm layer height was 0.05mm
I also enabled Brim with a 4mm width to minimize curling/shrinkage, and manually slowed the print speed for the last few mm's to minimize heat buildup. It did not take a lot of work to sand and paint the neck block in the images but I don't think I would want to do it for 24 of them. Casting is a better option for that many.
Steve
90 downloads
-
Free
Colonel Barkers NSD Eye front.
By Aaron J Climas
This model was made in Maya and converted to STL.
It has been printed once on an 'Up' printer, and took 3hour 20min in total. Feel free to share images of your own prints of this model.
Cheers,
Aaron
50 downloads
(0 reviews)0 comments
Submitted
-
Free
-
Free
Gun Boss rear
By chrisosborne
Changed relief at back for ball joint, otherwise solid. Holes on the model are oversized.
247 downloads
-
Free
NSD Eye STL Files
By henryjolly
Eye2 is hollow without a stem and Eye4 is hollow with a stem. Perfect for printing then adding an LED.
346 downloads
-
Free
Slat-small-shell-STL
By acrylikhan
STL File for stereolithography. NSD Shoulder Slat: Size Small. File Version 2.0
192 downloads
-
Free
Slat-large-shell-STL
By acrylikhan
Large Slate for NSD type Dalek. Verison 2. Format STL. For Stereolithography.
234 downloads
-
Free
Dead Planet Octagon
By Ferrain
Quick Sketchup generated file for the octagonal supports of a Dead Planet Dalek Gun.
Dimensions taken from PDF Plans for 3mm gun gods, gun barrel hole slightly oversized after first print, thickness 2.5mm.
16mins print time on medium quality 15% infill
No further versions planned, just done for proof of concept.
93 downloads
(0 reviews)0 comments
Updated
-
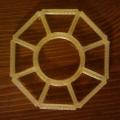
Free
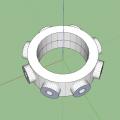
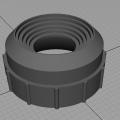
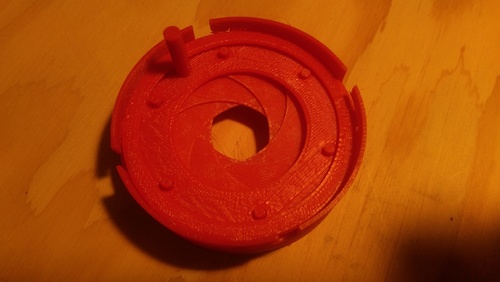
NSD Moflash Cage For 3D Printing
By Ferrain
Second published attempt at anything like this, for 3D printing so please be gentle.
NOTE The screenshots show some pieces that have been printed unsanded & untrimmed & they also show cages V1.99 & V2 (The only part that is constant in both is the top ring), from the test fitting a roll back to V1.99 for the supports & base may be required for a deeper recess of 3mm.
The Top ring takes about 30 - 40 minutes on a Replicator 2 at Highest Quality settings.
A support piece takes about 32 minutes on a Replicator 2 at Highest Quality settings, these could be multiplied up to the required 8 for the output file.
The base will take about 3 hours on a Replicator 2 at Highest Quality settings.
It is suggested that a hot pin be pressed through the build material using pliers & suitable heat source for each support at the top & bottom rings after gluing for additional strength.
Despite various efforts a one piece print has not gone smoothly so still a kit of 6 parts not including Moflash lens, if a one piece is successfully produced, the file will be added as a compliment.
Constructive feedback welcome.
518 downloads
-
Free
Gun Box Detail
By hallam
NSD Gun Box Detail as STL file.
Back of the piece is hollowed out to minimize use of material. Wall thickness is 1 mm. I paid $25 for printing and after sanding and filling, glued the result to a piece of acrylic to give it a flat base to make moulding easier.
117 downloads
(0 reviews)0 comments
Submitted
-
Free
Neck Block Detail
By hallam
NSD Neck Block Detail as STL file suitable for digital printing.
The inside of the neck block is hollowed out to minimize use of material. Wall thickness is 1mm.
127 downloads
(0 reviews)0 comments
Submitted
-
Top Downloads
Week
-

Free
-
Free
-
Free
-
Free
-

Free
Month
-
Free
-
Free
-
Free
-
Free
-

Free
Year
-
Free
-
Free
-
Free
-

Free
-
Free
All Time
-
Free
-
Free
-
Free
-

Free
-

Free
-
-
Recent File Reviews
-

Michael56 2
I'm in my late 60's. I live in Australia and have always enjoyed Doctor Who from the very first episode aired here around 1965 when I was 9 years old. Thought how amazing it would be to have a Dalek but had no idea how or where to even begin UNTIL I came across this site. Thanks for giving me the opportunity to at least be able to start on a Dalek build and will detail my progress as it goes along.
-
Mark Sheriff 6
Excellent , looks great and very well designed , well thought out . thank you
-
Marc Harris 54
I'm in my 50s and have since I was a boy watching Dr Who in the 70s always dreamed of making a Dalek for fun, now I have the time and resources, along with your forum's help it's time to live that dream.
I have watched some of the members videos, and I am very impressed with what I have seen.
Long live the Who verse.
I will document my progress and share any innovations I make
-
Chris R 25
Great set of models that printed and fitted together really easily. Can't comment on accuracy as I'm no expert but very happy with the result
-

Dalek Hal 312
Great file, easy to print
-
doctorone 3
Great plan but the pivot does not print as it is not complete like the eye stalk
-


-
Download Statistics
-
Recent File Comments
-

-
By WhosWho · Posted
@RepeatedMemeDid you change something? I haven't touched anything. -
By RepeatedMeme · Posted
@WhosWho @dalekray It's only showing an update because the (written) details were edited. -

-
By life size · Posted
I printed mine in PTEG, 235 nozzle, 60 Bed , no supports and it printed with no mess at all. I ran it at a 40 percent print speed, and the orientation was large cup facing down on my print. -

By John · Posted
See this FAQ topic for more on Downloads availability: -
By ChristmasDalek · Posted
Welcome to the forum! Sorry you have encountered a problem... While waiting for someone who knows more about the downloads section than I do to answer, you may find the explanation in @Johns answer to this thread: Be well, Kathy -
By tardis112 · Posted
Why am I not permitted to download this? -

By Mark Casto · Posted
This is such a useful file for the eye it is perfect for adding a fish tank led inside and looks great thank you. -
By DarthCranium · Posted
ok @Bodule. i apologize if i caused any issue. -

By Bodule · Posted
Hi @DarthCranium Can I suggest that you ask your question in the 3D Printer Discussions section of the forum please? https://www.projectdalek.com/index.php?/forum/209-3d-printer-discussions/ That section itself may be worth a read through, as is @ChristmasDalek's post above yours 👆 here as it may provide additional useful information on how to use the forum. -
By DarthCranium · Posted
What is a good size of 3D printer youd recommend if i wanted to make a dalek of my own? please let me know when able. Thanks -
By Dalek-Nik · Posted
Moflash lenses appear to be slightly difficult these days. the best bet in my opinion is 3D printing them. there are many accurate models here that can be printed on any FDM printer you can find. there is a chance that you can find the lenses online to buy, but those sites can be slightly sketchy. depending on the filament you buy and the printer you have/find, they can be produced fairly accurately. filament can come as cheap as 17 dollars, but do keep in mind that they can some
-
-
Highest Rated Submitters
No ratings this week.
No ratings this month.
-
1
-
2

-
3
-
4
-
5

-
1
-
2

-
3
-
4

-
5
-
-
Current Donation Goals
-
Finance the Forum Hosting 2024Raised 113.00 GBP
-
-
Top Templates
-
Free
-

Free
-

Free
-

Free
-
Free
-