-
Registration
Please register an account to access the Forum topics and features.
An Active Membership subscription gives you access to extra features and exclusive content!
Choosing Active Membership is a great way of supporting the community and showing your appreciation for our resources.
Please note that you need to register BEFORE you can use Facebook, Twitter or Google as a sign in method.
Files For 3D Printing
Files that can be used to for 3D printing physical versions, using your own printer or a service such as Shapeways etc.
Note that files for CNC and laser cutting can be found in their own sub-section, inside.
248 files
-
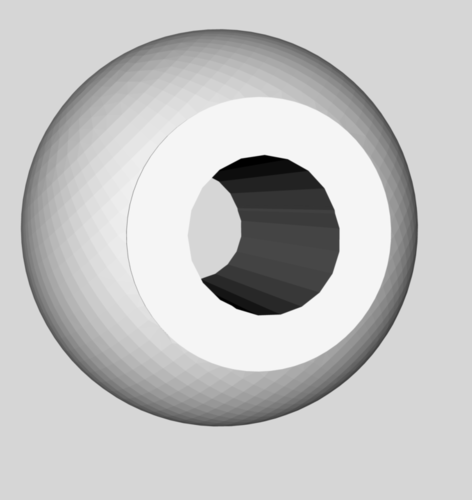
Free
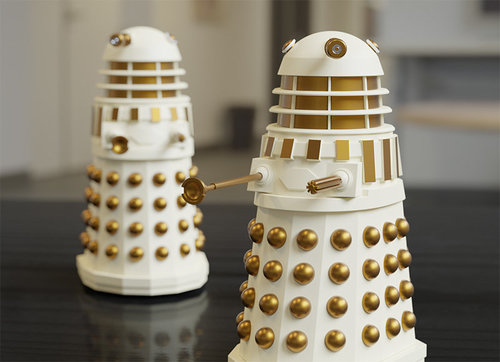
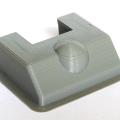
Eye design
By MechDesign
This is a design I did for Nigel and his new dalek that will be named Avo.
132 downloads
-
Free
3d printable NDP Shoulders
By Chris Moliere
Here it is! This thing took an eternity to design, and would have taken much longer if the Loft tool didn't exist. There are 66 bodies in this, which I might need to rename soon, but I think their size will help with their placement. Enjoy!
179 downloads
-
Free
Imperial Dalek 5 inch Model Kit
By audrey2
To make up for the fact that there is no sufficiently accurate 5 inch model Imperial Dalek, here is a small 3D printable model kit to create your own.
This was modelled in Blender, with FDM style 3D printing in mind (although if anyone makes a resin one, please let me know, I'd love to see how it turns out), and the parts have a tolerance of around 0.15mm to fit together.
Only the plunger and the shoulders require printing with support material, and I have provided a visual instruction booklet showing the basics of how to assemble the model.
265 downloads
-
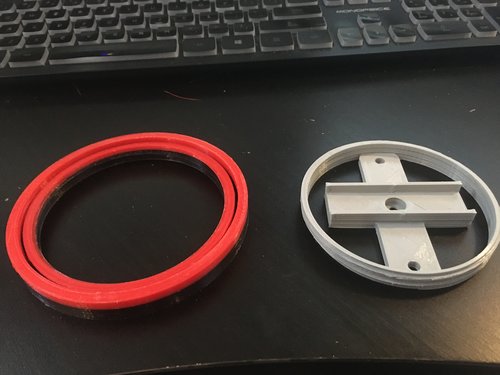
Free
NSD Light Cage with Thread
By DalekDucky
NB: Single zipped folder or 6 individual files - your choice
So I wanted a light cage that did not show screws when assembled and came up with this solution.
It's essentially a remix of @Ultrastar Light cage with the following modifications.
Added thread to the lower part of the cage plus the inner part of the threaded piece to be attached to the Dalek head The hole for the base and top is slightly larger to make screwing around the cage easier no change to his support
In this file I also included the surround part I did for my bulb using a trailer light. The spring from the light lid holds it in place to the lower part so no attachments required.
I used a Ping Pong bulb inside the moflash. so you may want to use some hot glue to secure that part.
The lower part has indentation to allow for my trailer base, if you don't need that, that part is low enough that should not be seen in your cage.
Enjoy
P.S. You will need to rotate a few pieces for print. support needed for some parts depending on your printer calibration.
158 downloads
-
Free
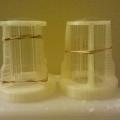
NSD Gun Box Detail (FDM)
By DrJekyll
This NSD Gun Box Detail has been modeled for use with FDM printers, if you have access to SLS type printers you will be better off using Hallam's model.
I used Slic3r 0.9.9 to generate the gcode and printed it in PLA on my home built Mendel Prusa i2, with Sanguinololu electronics, Marlin firmware, and a J-Head hot end with the settings below.
; layer_height = 0.20
; perimeters = 2
; top_solid_layers = 5
; bottom_solid_layers = 0
; fill_density = 0.1
; perimeter_speed = 35
; infill_speed = 55
; travel_speed = 130
; nozzle_diameter = 0.35
; filament_diameter = 2.82
; extrusion_multiplier = 1
; perimeters extrusion width = 0.50mm
; infill extrusion width = 0.50mm
; solid infill extrusion width = 0.50mm
; top infill extrusion width = 0.50mm
; first layer extrusion width = 0.50mm
I also enabled Brim with a 4mm width. I should have made the brim wider as I got a bit of curling on the corners. I recommend you use a heated bed for this part.
To counteract the curling I placed the part on a disc of hardboard just bigger than the center hole. I them placed weights (cans of beans) on the corners and gently heated the part with a hair dryer until the corners dropped. They are now curling in the opposite direction which will not be a problem once bolted in place.
83 downloads
-
Free
Dalek Eyestalk Discs
By cdngoose
Here is a simple file, I have found a baby Blue PLA filament that is quite close in colour and these simple files can be adjusted to suit the size you need for your own Dalek. They can also be painted if you don't have access to the light blue filament..
303 downloads
-
Free
NSD 3D Print Components
By tlmxcpmpp
File contains various New Series Dalek components for 3D printing, including...
Claw Cowl Dome Dome Turntable Eye Gun components. Hemisphere Neck Rings Slats
Photo shows Dalek built using these components (along with traditional build methods).
443 downloads
-
Free
DalekStorm-Parts2.zip
By Djsloanau
Attached is the zip of all STL parts to date as well as a couple of the Lightwave 2015 object files for Djsloanau's 1/6 Scale 3D Printed Dalek Storm. It has been 3 years since I started the project and I don't know if or when I'll get back to it. If you can use this to complete a Storm I'd love to see your photos.
93 downloads
-
Free
NSD screw-on Hemi.stl
By DalekDucky
NSD screw-on Hemi
Here is my first dive into creating an STL
Because I want the ability to change my Hemi's at Christmas to have lights inside of them, Dalek camouflaged as a Christmas tree, I created this Screw on Hemi holder.
Two parts,
Internal bracket has three holes for screws, center could be removed but I wanted it to ensure the hemi was centered, it also has a bracket for my LED lights as seen in picture.
Outside bracket is simply a bracket to glue on the Hemi using two parts Christmas ornaments and then simply screw it onto the internal bracket.
Could be handy for quick replacement option of hemi
Hope it helps someone else
Oh! The screw holes are for 3/16.
DalekDucky
125 downloads
-
Free
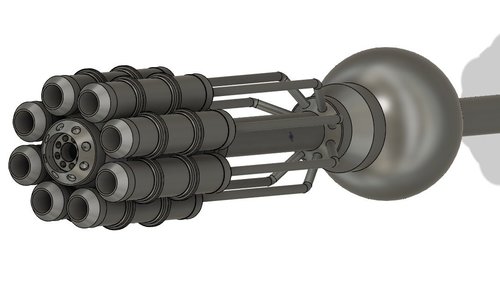
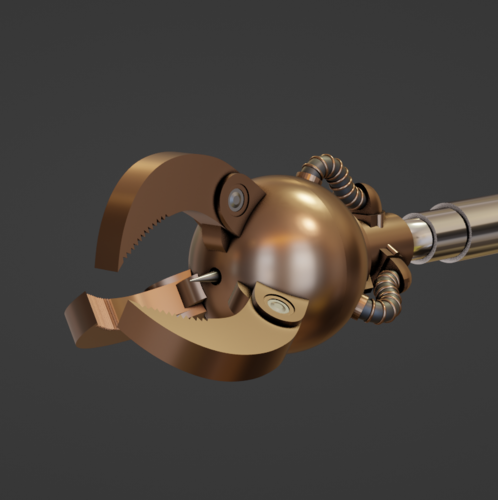
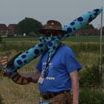
"Eve of the Daleks" Gatling Gun for NSD. Full Size, Rotating
By threegringos
This is the NSD "Gatling Gun" weapon as seen on the trailers for the 2022 New Year's episode "Eve of the Daleks".
This 3D model was made before the episode aired, so the scren shots were very limited. It looks accurate to my eye, however more details may become apparent once we get to see the entire episode.
I used Fusion360 to create this model. It's split into multiple parts for ease of printing.
You will need to provide a 25.4mm (1 inch) diameter pipe for the arm, and also mount a suitable 102mm (4 inch) ball-joint. I always use magic 8-ball toys for my ball joint.
The eight small pipes coming out of the rear of the gun part are 6mm diameter. You can either print them from my files, or optionally use stainless steel drinking straws, cut to length.
I did include an internal gear in the main body of the gun, and an additional pinion gear in case somebody wants to motorize the rotation of the weapon. I haven't had time to figure that out yet.
130 downloads
-
Free
Slat-large-shell-STL
By acrylikhan
Large Slate for NSD type Dalek. Verison 2. Format STL. For Stereolithography.
234 downloads
-
Free
Gun Boss rear
By chrisosborne
Changed relief at back for ball joint, otherwise solid. Holes on the model are oversized.
247 downloads
-
Free
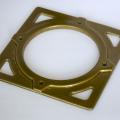
NSD Neck Block (FDM)
By DrJekyll
This NSD Neck Block has been modeled for use with FDM printers, if you have access to SLS type printers you will be better off using Hallam's model.
I used Slic3r 0.9.9 to generate the gcode and printed it in PLA on my home built Mendel I2, with Sanguinololu electronics, Marlin firmware, and a J-Head hot end with the settings below.
; layer_height = 0.2
; perimeters = 2
; top_solid_layers = 5
; bottom_solid_layers = 0
; fill_density = 0.12
; perimeter_speed = 35
; infill_speed = 55
; travel_speed = 130
; nozzle_diameter = 0.35
; filament_diameter = 2.82
; extrusion_multiplier = 1
; perimeters extrusion width = 0.50mm
; infill extrusion width = 0.50mm
; solid infill extrusion width = 0.50mm
; top infill extrusion width = 0.50mm
; first layer extrusion width = 0.50mm
In addition to the Slic3r settings above I also lowered the layer height near the top to reduce the step effect.
Between 14.0mm and 15.3mm layer height was 0.15mm
Between 15.3mm and 16.3mm layer height was 0.10mm
Between 16.3mm and 17.1mm layer height was 0.05mm
I also enabled Brim with a 4mm width to minimize curling/shrinkage, and manually slowed the print speed for the last few mm's to minimize heat buildup. It did not take a lot of work to sand and paint the neck block in the images but I don't think I would want to do it for 24 of them. Casting is a better option for that many.
Steve
90 downloads
-
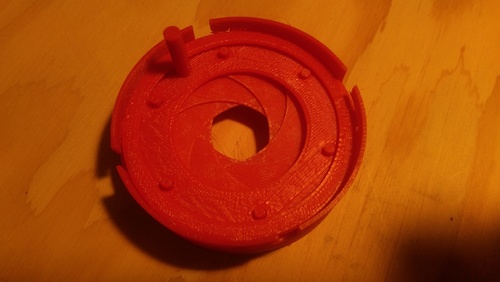
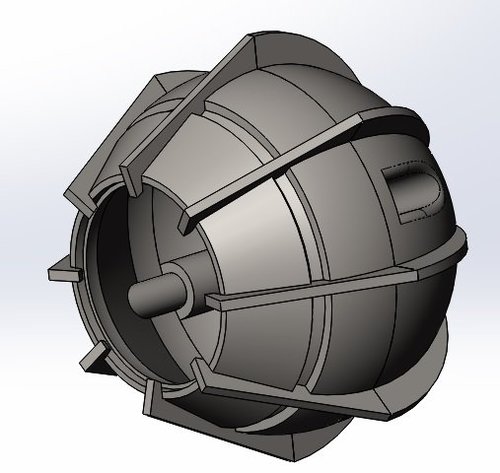
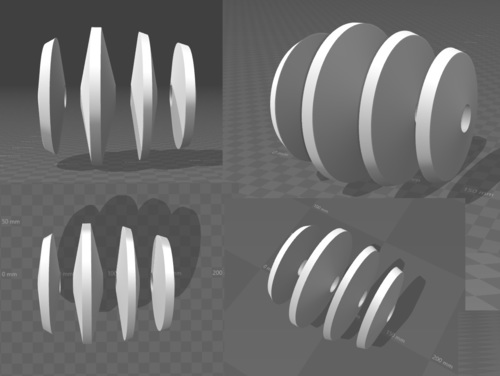
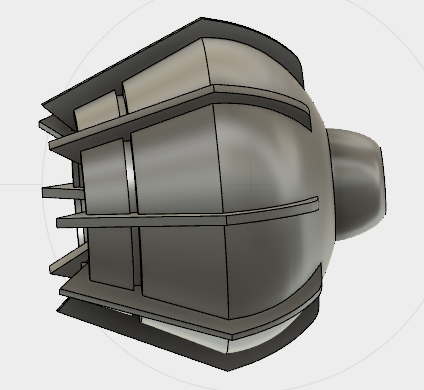
Free
NSD Iris
By trickster
This is a working iris insert. It fits this eyeball by Slythenperior very snugly after both parts are lightly sanded smooth. This is in initial version. I'm going to add parts for attaching an led and stepper motor but I don't have either of those yet and thought the iris alone might be useful.
There are six object files:
Casing - everything fits inside the casing and it fits into the front of the eyeball SlotRing - fits inside the Casing on two keys Leaf - you will need six of these Peg - you will need six of these, one for each leaf HoleRing - this has a handle for attaching a stepper motor LockRing - keeps it all together
Note that the casing has some slots with overhangs. Automatically generated supports did not work so I added some tiny blocks instead. Once it's printed just clean them out. Don't use supports or raft.
One end of each leaf has a pin which is offset from the center. The other end has a hole through it and an indent on the same side as the pin. Press a peg through the hole so that there's a pin on each side of the leaf and the base of the peg fits into the indent. The peg should lock into place. I had to print a few extra leafs because some of them were too loose a fit. You can use glue if the pegs don't fit tight enough. Make six leaf/peg assemblies and lightly sand them smooth.
Insert the slot ring into the casing lining up the notches with the keys:
Lay the leafs in one at a time. The offset pin (the one printed as part of the leaf) goes in one of the slots. Place each leaf on top of the previous ones. The first 4 are easy. The last two, you have to slide them under the first leafs.
Once you have all six leafs seated in the slot ring, place the hole ring on top. Wiggle it around until all six pins are set. Then add the lock ring, pressing it down and turning it.
Here's how it looks when done:
Here is a zip file of all the parts (version 1.1): NSDIris1.1.zip
448 downloads
-
Free
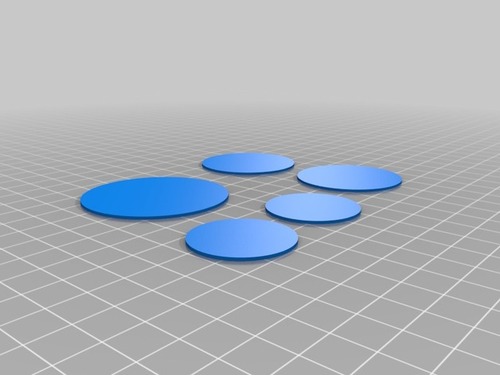
Imperial Dalek Eyediscs
By Aaron J Climas
A relatively quick version of the Imperial Dalek eye discs. They are based on (A forum members- someone please help!) measurements from a few years ago. I haven't had a chance to test print these.
Included are all four discs as separate files as well as a combined download of all four. The discs are about 11mm or so apart, and have a 25/26 mm hole partially extruded on both sides of each disc, but not
the whole way through so you have a little choice of construction.
Please give me a shout if you have any issues with them.
239 downloads
-
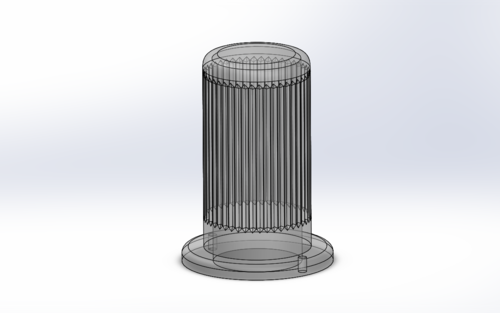
Free
NDP Eye
By threegringos
Here are the eye model files that I created for Orin - my NDP dalek build. All measurements were taken directly from the PDF plans.
You need to print one Front, one Rear, and eight Fins for the eye, and five Rings for the eye-stalk. I printed everything using 1.5mm wall thickness and 15% fill.
Everything was assembled with friction fit. No glue or screws. The fins fit tightly into the body of the eye and hold everything together.
When assembling, I started by inserting the rear of all the fins into the rearmost point of the eye body, then folded them inward one at a time. This works nicely because you can easily access any electronics that you install into the eye. Just open out the fins from the front until the eye front drops out.
244 downloads
-
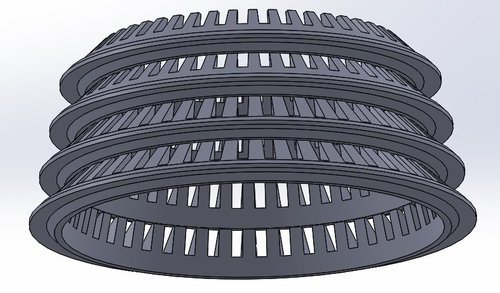
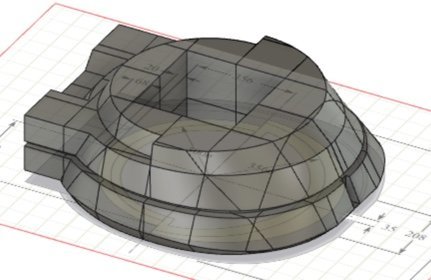
Free
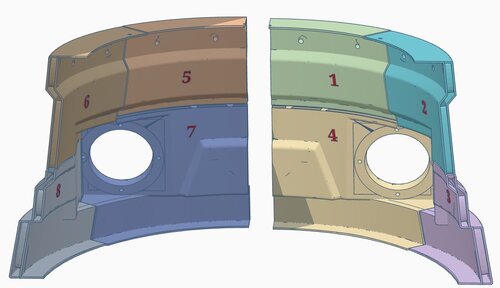
TDP Neck Rings - Corrected Files
By MechDesign
Although these may have been posted before I've designed these with internal coring that ends up with just over 55% less material.
The "base" pieces are the solid rings underneath each level of the structure, Ring1 is on the bottom.
8 pieces of each will need to be printed. The longest dimension is a tad over 8.5 inches so this can be done with larger format printers.
If you have the capability to manipulate the imported STL files I suppose you could cut them in half and print them on a smaller frame printer.
Nigel was able to print a 2 rib partial piece of Ring1 so I'm going under the assumption that he can print a full sized set. In fact he will be doing this set for his new dalek this next year.
44 downloads
-
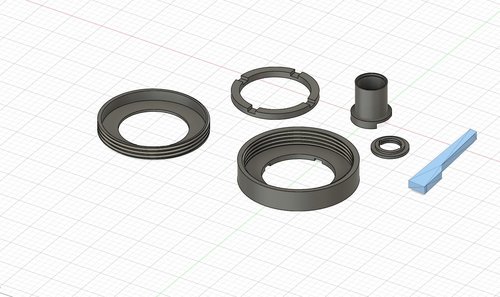
Free
NSD sphere for gun or plunger
By Mr zen
NSD gun / plunger barrel sphere the hole can be altered to suit the diameter of the tube your are using for your build. when fitted i used felt to stop any friction when in place
113 downloads
-
Free
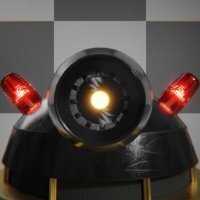
Moflash Lens STL (NSD dome lights)
By ddoherty958
This is my Moflash lens for the NSD dome lights. It's just the lens, no cage. It's as accurate as I can make it, of course feedback is welcome.
If you want to try printing it in clear filament here's the file! I found it extremely hard, having problems with bed adhesion in particular.
176 downloads
-
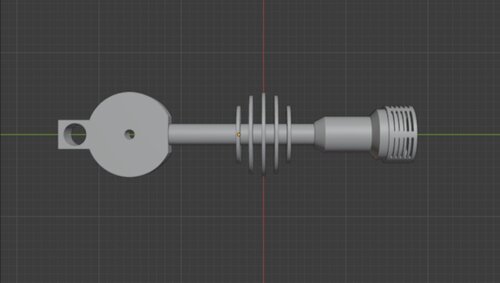
Free
Accurate plunger - high poly
By ansonjames
60's/70's Style plunger created using the newer plans. Can be printed with FDM or SLA.
I added a rod at the bottom to slide onto the last stage of the arm, if you don't intend to use this part then you can import into Microsoft 3D builder, go to edit and split model.
93 downloads
-
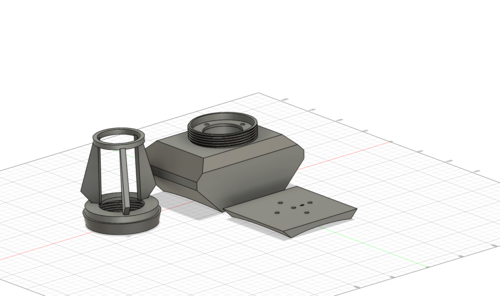
Free
NSD Supreme Screw on Light cage w base
By DalekDucky
This is the screw-on light cage with base for the NSD Supreme Dalek complete with the dome base.
Printing
The inner base prints hallow, I recommend you print it on one of its side with support on the baseplate only. If your bridges are well calibrated it prints no problem for the top of the print (opposite side)
The base follows the contour of the NSD dome perfectly.
There are four holes in the base to screw onto to the dome. Two screws is likely all you need (Top and bottom) but why take a chance
I included a guide to help you properly place the pilot holes on your dome for the base, c/w a little arrow on the template as well as inside the base piece for correct orientation.
The light cage just screws on top of the base. Making both painting and changing bulbs easy.
35 downloads
-
Free
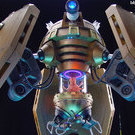
Custom Emperor Design Figure
By Jack Grace
Hi folks!
My pal taught me how to use 3d print software and I basically went into a fugue state and made this in a couple of hours.
I quite like his look of him, but it's obvious I'm a beginner by how I used repeated basic functions to create complex shapes somewhat inefficiently.
My pal is gonna let me upload her files on here too, and I'll clearly label them as such, but you can probably tell ours apart because my code is always about twice as long as it could be.
My emperor is designed to scale with 5" figures and combines the general shape of a TV21/comic emperor with the looming size of an Evil Emperor.
11 downloads
-
Free
Planet Supreme Dalek: Eye Stalk
By Necrosis
This is a download for the Planet Supreme Dalek eye stalk. The files are in .stl format making them easy to 3D print or to use as digital references/models. These parts are 1:1 scale and match the most recent revision of the Planet Supreme Dalek plans making it plug and play to print or easy to scale to your Daleks needs. I personally 3D printed these units in colored SLA giving a refined finished look. Recommend printing these parts slow and precise at 15% infill for best results with standard 3D printers. Torch light files are based on "Sparky_Butane's" file and cross referenced with the Planet Supreme Dalek build plans as well as adapted for use with other included files.
(Would love to see any print results from anyone who chooses to share on this thread)
Details:
Scale - 1:1 (In compliance with Planet Supreme Dalek Plans Version 3.2)
Parts included in this download - Eye Stalk * Eye/Torch Piece * 3 Stalk Discs * Eye Pivot
NOTE: For ease of assembly, parts have a 0.5mm to 1mm tolerance. The eye Pivot has a 12mm (1/2") hole in the center for a bolt and a larger hole on the backside that can be used to attach a control rod for the eye stalk.
I will keep these files up to date and if you have any suggestions or find any errors please let me know so that I may update the parts.
20 downloads
-
Free
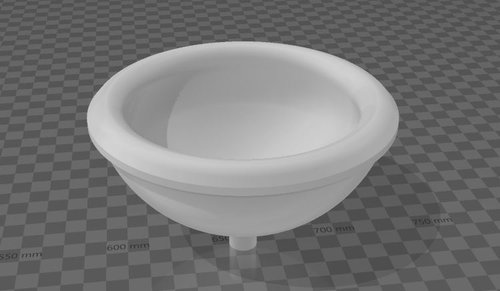
1960s Egg Cup
By monkeytennis
This model comprises a 1960s egg cup model used on the Daleks between The Chase and The Evil of the Daleks.
I own a set of original egg cups and this model was made using measurements from the actual item.
It's in OBJ format. There is a second object in the file. This is a cube of precisely one meter in all dimensions. This is an aid for scaling if necessary.
51 downloads
-
Free
NSD Moflash Cage For 3D Printing
By Ferrain
Second published attempt at anything like this, for 3D printing so please be gentle.
NOTE The screenshots show some pieces that have been printed unsanded & untrimmed & they also show cages V1.99 & V2 (The only part that is constant in both is the top ring), from the test fitting a roll back to V1.99 for the supports & base may be required for a deeper recess of 3mm.
The Top ring takes about 30 - 40 minutes on a Replicator 2 at Highest Quality settings.
A support piece takes about 32 minutes on a Replicator 2 at Highest Quality settings, these could be multiplied up to the required 8 for the output file.
The base will take about 3 hours on a Replicator 2 at Highest Quality settings.
It is suggested that a hot pin be pressed through the build material using pliers & suitable heat source for each support at the top & bottom rings after gluing for additional strength.
Despite various efforts a one piece print has not gone smoothly so still a kit of 6 parts not including Moflash lens, if a one piece is successfully produced, the file will be added as a compliment.
Constructive feedback welcome.
518 downloads
-
Top Downloads
Week
-
Free
-

Free
-
Free
-
Free
-
Free
Month
-
Free
-
Free
-
Free
-
Free
-

Free
Year
-
Free
-
Free
-
Free
-

Free
-
Free
All Time
-
Free
-
Free
-
Free
-

Free
-
Free
-
-
Recent File Reviews
-

Michael56 4
I'm in my late 60's. I live in Australia and have always enjoyed Doctor Who from the very first episode aired here around 1965 when I was 9 years old. Thought how amazing it would be to have a Dalek but had no idea how or where to even begin UNTIL I came across this site. Thanks for giving me the opportunity to at least be able to start on a Dalek build and will detail my progress as it goes along.
-
Mark Sheriff 6
Excellent , looks great and very well designed , well thought out . thank you
-
Marc Harris 64
I'm in my 50s and have since I was a boy watching Dr Who in the 70s always dreamed of making a Dalek for fun, now I have the time and resources, along with your forum's help it's time to live that dream.
I have watched some of the members videos, and I am very impressed with what I have seen.
Long live the Who verse.
I will document my progress and share any innovations I make
-
Chris R 25
Great set of models that printed and fitted together really easily. Can't comment on accuracy as I'm no expert but very happy with the result
-

Dalek Hal 312
Great file, easy to print
-
doctorone 3
Great plan but the pivot does not print as it is not complete like the eye stalk
-


-
Download Statistics
-
Recent File Comments
-

-
By WhosWho · Posted
@RepeatedMemeDid you change something? I haven't touched anything. -
By RepeatedMeme · Posted
@WhosWho @dalekray It's only showing an update because the (written) details were edited. -

-
By life size · Posted
I printed mine in PTEG, 235 nozzle, 60 Bed , no supports and it printed with no mess at all. I ran it at a 40 percent print speed, and the orientation was large cup facing down on my print. -

By John · Posted
See this FAQ topic for more on Downloads availability: -
By ChristmasDalek · Posted
Welcome to the forum! Sorry you have encountered a problem... While waiting for someone who knows more about the downloads section than I do to answer, you may find the explanation in @Johns answer to this thread: Be well, Kathy -
By tardis112 · Posted
Why am I not permitted to download this? -

By Mark Casto · Posted
This is such a useful file for the eye it is perfect for adding a fish tank led inside and looks great thank you. -
By DarthCranium · Posted
ok @Bodule. i apologize if i caused any issue. -
By Bodule · Posted
Hi @DarthCranium Can I suggest that you ask your question in the 3D Printer Discussions section of the forum please? https://www.projectdalek.com/index.php?/forum/209-3d-printer-discussions/ That section itself may be worth a read through, as is @ChristmasDalek's post above yours 👆 here as it may provide additional useful information on how to use the forum. -
By DarthCranium · Posted
What is a good size of 3D printer youd recommend if i wanted to make a dalek of my own? please let me know when able. Thanks -
By Dalek-Nik · Posted
Moflash lenses appear to be slightly difficult these days. the best bet in my opinion is 3D printing them. there are many accurate models here that can be printed on any FDM printer you can find. there is a chance that you can find the lenses online to buy, but those sites can be slightly sketchy. depending on the filament you buy and the printer you have/find, they can be produced fairly accurately. filament can come as cheap as 17 dollars, but do keep in mind that they can some
-
-
Highest Rated Submitters
No ratings this week.
No ratings this month.
-
1
-
2

-
3

-
4
-
5

-
1
-
2

-
3
-
4

-
5
-
-
Current Donation Goals
-
Finance the Forum Hosting 2024Raised £113
-
-
Top Templates
-
Free
-

Free
-
Free
-

Free
-
Free
-
.jpg.bbea27595cd1974ae827490855ccce97.jpg)