-
Registration
Please register an account to access the Forum topics and features.
An Active Membership subscription gives you access to extra features and exclusive content!
Choosing Active Membership is a great way of supporting the community and showing your appreciation for our resources.
Please note that you need to register BEFORE you can use Facebook, Twitter or Google as a sign in method.
Files For 3D Printing
Files that can be used to for 3D printing physical versions, using your own printer or a service such as Shapeways etc.
Note that files for CNC and laser cutting can be found in their own sub-section, inside.
246 files
-
Free
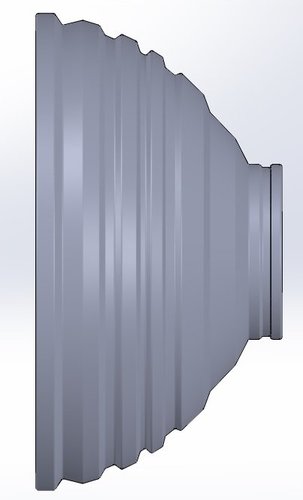
Movie_Dalek_Light_Lens.stl
By AlanB01
Movie_Dalek_Light_Lens.stl. Just been modeling the 60's movie dalek from the plans on here, great plans guys, so I thought I'd model the lights first so here is my take on the light lens, use as you will just give me a mention. Enjoy.
8 downloads
(0 reviews)0 comments
Submitted
-
Free
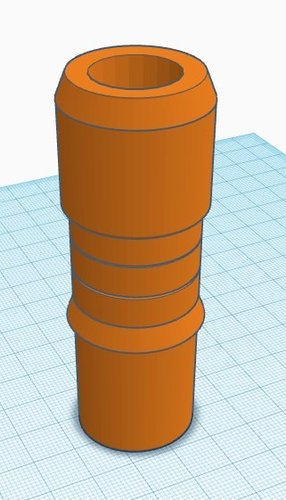
NDP Eye
By threegringos
Here are the eye model files that I created for Orin - my NDP dalek build. All measurements were taken directly from the PDF plans.
You need to print one Front, one Rear, and eight Fins for the eye, and five Rings for the eye-stalk. I printed everything using 1.5mm wall thickness and 15% fill.
Everything was assembled with friction fit. No glue or screws. The fins fit tightly into the body of the eye and hold everything together.
When assembling, I started by inserting the rear of all the fins into the rearmost point of the eye body, then folded them inward one at a time. This works nicely because you can easily access any electronics that you install into the eye. Just open out the fins from the front until the eye front drops out.
244 downloads
-
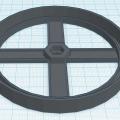
Free
NDP Neck Rings
By threegringos
I created these files for Orin - my NDP Dalek build. All measurements were taken from the PDF plans.
You need to print 12 of each file. I used PLA with 1mm wall thickness and 10% fill, but I would advise to go thicker - maybe 1.5mm, as the parts will warp under direct sunlight. Alternatively, try using ABS, which is less sensitive to ambient temperature.
For assembly, start at the bottom with Layer 1, then build up as follows: Layer 2 base, Layer 2, Layer 3 base, Layer 3, Layer 4 base, Layer 4. I added some strength by offsetting each base layer so that the joints did not all align vertically.
291 downloads
-
Free
NDP Plunger
By MechDesign
I think this is very close to the design shown in the plans. Let me know if there is something obviously wrong.
55 downloads
(1 review)0 comments
Submitted
-
Free
NDP Telescoping Joint
By bryanxiii
This is the joint you see at the midsection of the telescoping plunger arm.
Measurements based on NDP Plans.
I added a tube at the bottom to push into the larger portion of the plunger arm to help secure it and have something to glue to.
The OSD of addon tubing is 27mm.
The ISD overall is 18mm to give 1mm of clearance on the 17mm OSD telescoping tube.
Print orientation: I would suggest printing this with the tapered section down with a build plate.
Density: My suggestion on this is 100% mainly to give strength to the section where it gets glued on.
If you need an alternative sizing version PM @bryanxiii
17 downloads
(0 reviews)0 comments
Submitted
-
Free
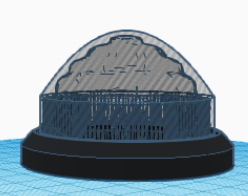
Neck Block Detail
By hallam
NSD Neck Block Detail as STL file suitable for digital printing.
The inside of the neck block is hollowed out to minimize use of material. Wall thickness is 1mm.
127 downloads
(0 reviews)0 comments
Submitted
-
Free
Neck ring tri-foil holder
By MechDesign
This item allows the builder to drill a straight 3/4 inch hole in the neck rings instead of trying to drill 3 small 1/4 inch holes right next to each other at an angle. The angle of the holes puts the tri-foils at the same angle as the neck rings in the Shawcraft Movie Dalek Plans.
49 downloads
(0 reviews)0 comments
Updated
-
Free
Necros/Renegade BASE (only) For Dome Lights
By Luke S
Took a long time and labor... just to get the slits in the bottom part. I used the Plans from the Necros and Renegade Daleks. Some Sanding may be needed after printing. It would be best for you to make a cast of the light part, and when you get those cast maybe you could sell them in the Sec shope for others 🤔
These Lights work perfectly for the Renegade Supreme, but you will need a band around the bottom.
Print Settings
Printer brand:
Creality
Supports:
Yes
Resolution:
0.1mm
Printer:
Ender 3
Infill:
100%
Filament_brand:
Filament_color:
Translucent white, Black
Filament_material:
PLA
59 downloads
-
Free
New Dalek Paradigm 1:10 scale
By ozzymat
The New Dalek Paradigm is at 1:10 scale and is in several pieces to allow parts to be printed in different colours or if painting to reduce masking.
Parts are keyed to aid assembly.
Appendages can be either compleletly printed or as in the photo a combination of printed and 3mm aluminium tube.
Modelled in Fusion 360 using Project Dalek "New Dalek Paradigm" plans as a reference.
Link build log video: https://youtu.be/v0x_3M-idzg
9 downloads
(0 reviews)0 comments
Submitted
-
Free
(0 reviews)0 comments
Updated
-
Free
NS Center Slat
By acrylikhan
Center Slat for New Series Dalek Design, Full Scale, Dimensions should be in Metric. Part should print on any 3D Printing Machine, test prints were achieved successfully with:
Objet/Stratasys Machines: Eden 333, Eden 500, and Connex 2 and Fortus 450mc (FDM)
3D Systems: SLA500, Projet 1200 (SLS)
181 downloads
-
Free
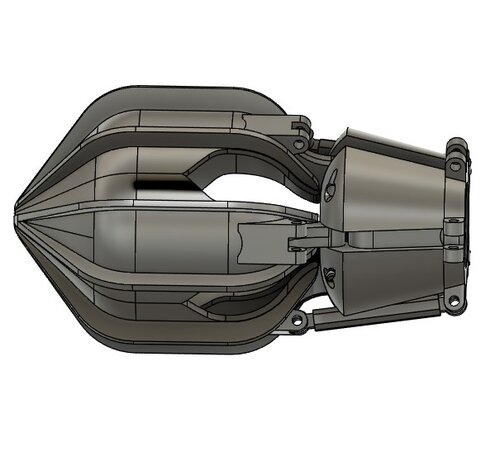
NSD 'Death-Squad' Dalek claw - "Revolution of the Daleks". Fully operational
By threegringos
This is my NSD 'Death Squad' claw as seen on the Daleks in the 2021 New Year's special "Revolution of the Daleks".
I made this originally for my own Dalek, (Dalek Axel). I've been constantly getting messages through my Instagram from people who want a claw, so I thought I'd release it here on Project Dalek for the community to use.
This 3D model was developed solely from screenshots and promotional images. It looks accurate to my eye, and some deliberate (but small) compromises were made to simplify the 3D printing process.
I used Fusion360 to create this model. The claw is split into multiple parts for ease of printing.
The ZIP file contains photos and instructions.
NOTE:
For assembly, you will need some 3mm diameter stainless steel rods or dowels for pivots. I bought a pack from Amazon, and cut them down to size.
You will need to provide your own arm (and Dalek) to mount the claw onto. The claw will fit a 25.4mm (1 inch) diameter pipe.
Enjoy!
77 downloads
(1 review)0 comments
Submitted
-

Free
NSD 2005 Big slat template
By ramsesvp
A template I am using for creating the right distance for the slats of my NSD Dalek
41 downloads
(0 reviews)0 comments
Updated
-
Free
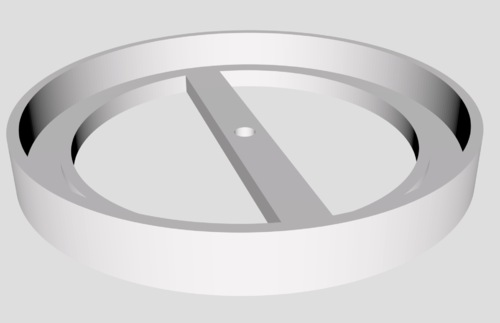
NSD 2005 Oil Seal
By glynharper
This is my own design for an oil seal replacement.
It's not perfect, as the edges are a little faceted. Although I actually don't mind that myself as it appears more 'machine made' which I think suits a Dalek's appearance.
It incorporates an inner lip, in order to centrally locate your hemisphere. There is also a central part, which has a hole and a hexagon recess for a standard M6 head head bolt. This is to eliminate the requirement for MDF discs or other mounting methods to be stuck inside the hemis.
The idea is, but an M6 bolt through the hole (which is a tight fit to stop it dropping out.. tap it in if need be).
Then put a bead of black silicone in the recess of the oil seal and push the hemi into it. You can silicone inside as well, as there is access to do so.
The central supports are a ribbed structure, to stop the oil seal being able to be pulled away from the skirt easily.
Although the central recess will lock the M6 bolt in place, bear in mind it's still plastic so it will easily break if you put too much torque on the nuts you use to hold the oil seal on with. Best not to use lock nuts, but use normal nuts with spring washers, and some loctite. Nip them up, but don't over tighten them.
Would love some feedback, as this is my first design for a 3D printed Dalek part.
65 downloads
-
Free
NSD 3D Print Components
By tlmxcpmpp
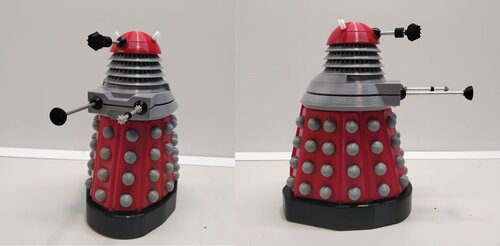
File contains various New Series Dalek components for 3D printing, including...
Claw Cowl Dome Dome Turntable Eye Gun components. Hemisphere Neck Rings Slats
Photo shows Dalek built using these components (along with traditional build methods).
441 downloads
-
Free
NSD centered oil seal
By beeweasd
i found one similar to this but it was slightly to big, so i made one with the correct dimensions.
171 downloads
-
Free
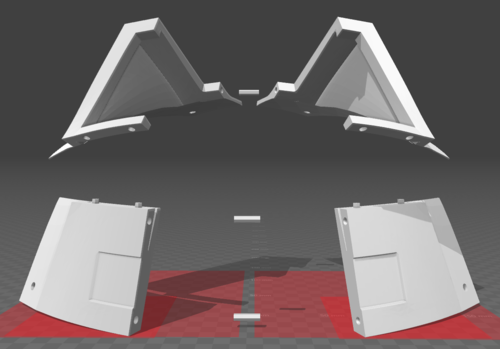
NSD Cowl
By trickster
Here is a set of models for creating an NSD cowl. Jbourd was kind enough to gift me with a 3d model of a complete Dalek dome and cruel enough to ask if I could separate out the cowl. It took a while but I managed to remove the dome and leave the cowl intact. Of course it is far to big to fit on my build platform. So I tried cutting it in half vertically. Each piece could only fit my build space in a few orientations. And due to the size and nature of the parts, they all warped beyond use. I wasted nearly a kg of filament on failed attempts. I decided to split it into quarters. This allowed for smaller parts which would fit flat and any warp would be to the thickness. Thought I had it nailed, but the thickness was warped enough so that the towards the back of the cowl the opening was too small to fit the eyestalk pivot. So I added a shim to compensate.
I have been using 3d Builder which is included with Windows 10. It has issues. For whatever reason I was able to separate out and save three out of four quarter pieces but the fourth would not save no matter what I did. So instead I used Replicator to mirror the pieces along the X-axis. That is why only right side parts are included. You have to use your build software to mirror them for the left side parts.
I've included the full cowl model in case you want to slice and dice it on your own. I've included the shim I used and a long peg to use with it. I suggest building out the four main parts and see if you need it.
Also the bottom parts had an issue with one corner pulling loose from the build plate and warping the holes. So I put a throw away block next to that corner to hold it down.
I printed everything at 10% fill .2mm thickness. Use full support and raft for the main pieces but not pegs and shim.
One thing I did not expect but really like is that in producing the curves, the printer leaves a pattern which is similar to wood grain. This is another reason why I included parts for only one side. By mirroring the parts the grain pattern is symmetrical.
Here's some pics. You can see the grain effect.
.
328 downloads
-
Free
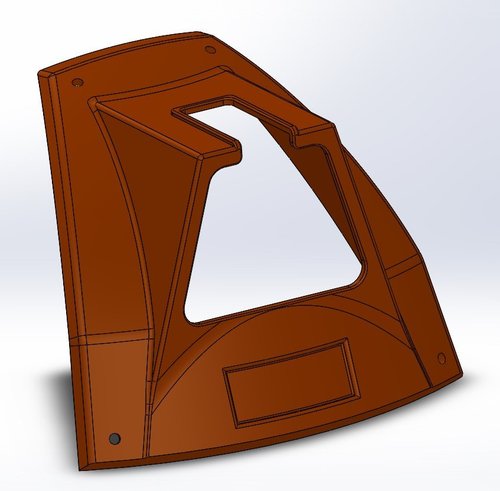
NSD Cowl
By Macropod80
This is the most accurate-looking I could get going by the dimensions in the official plans back in 2017 (which don't seem to me to quite work exactly as specified?) Fits fine on my Dalek Kevin's dome (bumpy as it is). Of course my version of 'exactly according to the plans' may well differ from your version of 'exactly according to the plans', but that's Dalek-building for you...
This has been around for a while so I know at least one other builder in the world has used it successfully.
I printed in PLA for toughness and lack of distortion, at 0.2mm layer height. Just barely squeezes into an UpBox+.
186 downloads
-
Free
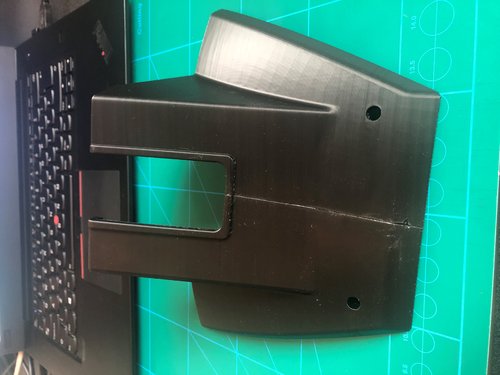
NSD Cowl Quadrants
By Pgordon
This is the NSD Cowl 1.0.0 By Macropod80, but split into 4 roughly equal sized quadrants which can be printed on printers with a much smaller build area. I created these splits for my Flashforge Adventurer 3 which only has 150x150x150 build area, and they print fine, and join together pretty well with nice tight seams. Someone more proficient at 3D modelling than I could perhaps improve these models by adding some alignment/reinforcing tabs along the joins to aid with accurate assembly and strengthen the joins in the assembled piece. In my case I joined the pieces with superglue and held them together by hand while the initial bond formed.
Whilst the seams are fairly tight & neat, they're not invisible, so the completed assembled cowl will still need filling, sanding & painting. The parts need to be printed with supports, which are not in these model files, you'll have to add them in your slicer.
I printed these in PLA with 0.2 layer height, and each quadrant is roughly a 16 hour print at the highest quality on my machine.
Hope this helps someone!
238 downloads
-
Free
(0 reviews)0 comments
Updated
-

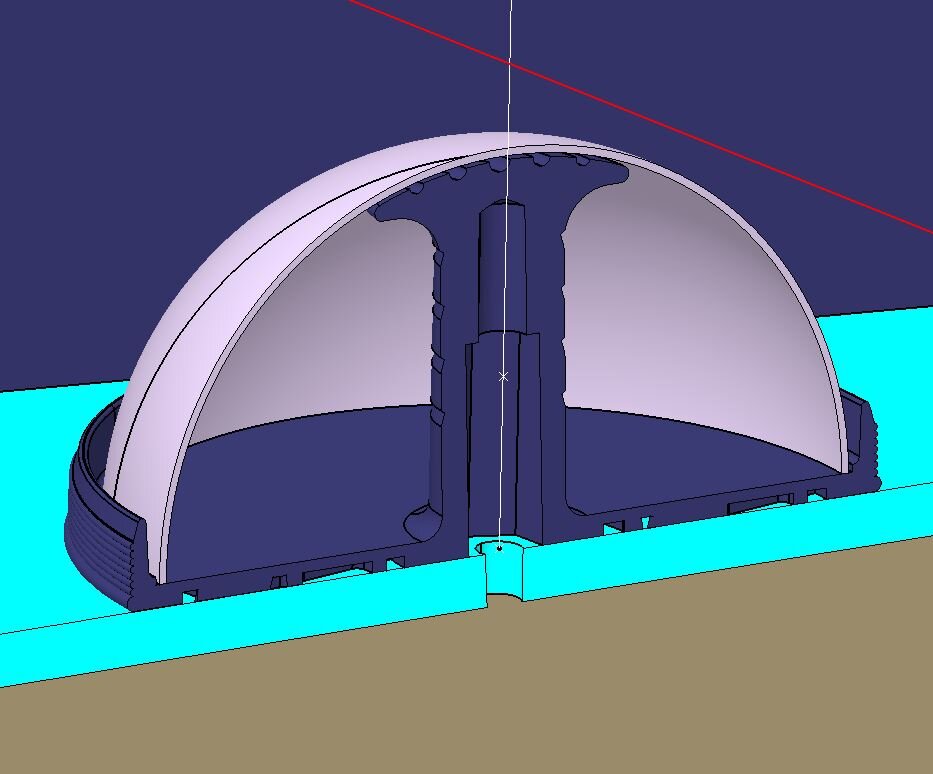
Free
NSD Dome Detail Kit
By trickster
This is a set of tools I made to help with detailing the dome. Some are attachments for a Dremel router base. These are useful for working on wooden domes. Others are more generic and can be used on any dome. All tools are shaped to fit along either the top curved part of the dome or the bottom cone part. Raft and support required where noted. They are numbered on this image and described below. The wrench is not included.:
1 Drill Guide - Guides drill bit perpendicular to dome surface
2 Dome Protractor - Marks out 45 degree angles
3 Dome Ruler * - Measures cm along the surface of the dome and from a center point
4 Long Longitude Arm * - Guide for longitudinal cuts, used with Base Adapter (7) maximum span
5 Short Longitude Arm * - Guide for longitudinal cuts, used with Base Adapter (7) span for lower dome cuts only
6 Latitude Arm * - Guide for latitudinal cut (back half of dome), used with Base Adapter (7)
7 Base Adapter * - Adapter which fits the Dremel router base. Key attaches to Longitude and Latitude Arms (4,5,6) or freehand
8 Angle Guide Bottom - Guides cuts on the cone portion of the dome, used with Angle Guide Top (9)
9 Angle Guide Top - Guides cuts on the cone portion of the dome, used with Angle Guide Bottom (8)
10 Cone Ruler * - Measures and marks the cone portion of the dome
11 Port Template - Marks the eyestalk port
12 Front Indent * - Marks the front indents
13 & 14 Rear indent * - Marks the rear indents, pieces glue together at chamfer angle
* raft and full support required
The Drill Guide, Dome Protractor, Dome and Cone Rulers, Port and Indent templates are pretty obvious how they work
The Base Adapter attaches to a Dremel router base and gives it a solid contact to the dome. It attaches to the router base with two rectangular keys and a pair of bolts/wingnuts. It can be used freehand or with one of the Arms which attach to it with a key block.
The Angle Guide pieces are joined by two 3/16" x 16" metal rods. The bottom mounts to a board and the Dremel router base rides the rods at the proper angle to fit against the cone portion of the dome. Like this:
Here's a build diary entry describing their use
Here's the whole thing: NSD Dome Detail Kit.zip
213 downloads
(0 reviews)0 comments
Updated
-
Free
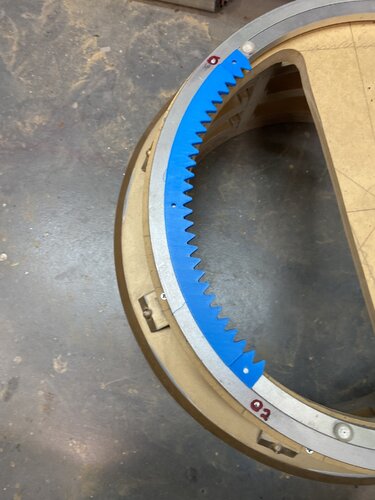
NSD dome rotation gears
By Nimitz
This gear and pinion is designed to fit a Lazy Susan which has a diameter for the inner ring of 415mm. This Lazy Susan is the perfect size to be used on an NSD dome. it may work for other domes but I've not tested it with anything but an NSD dome. You'll need to print 2 pieces of both the "A" & "B" parts. the ends have lap joints for stability and the countersunk holes are for 10-32 size bolts. the height of the gear has been designed so that you can leave the rubber feet that come with the lazy susan on the inner ring in place and the gear will be the same height. you will need to drill holes in the gear where your rubber feet are so it will sit flush with the bottom of your dome rotation plate.
Note: the picture shows the gear sitting on the top of the dome rotation plate but that was just to take the picture. the gear is mounted on the underside of the dome rotation plate which is why it is the same height as the rubber feet on the inner ring so it sits flush
70 downloads
(0 reviews)0 comments
Updated
-
Free
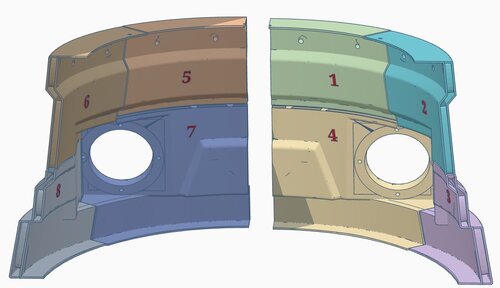
NSD double walled shoulders in 16 easy parts for 300 x 300 x 400 printers
By Prefect1938
Hello,
Please find the STL files for my 2005 Dalek’s shoulders. I took the original model shell from daviddz and put it into Tinkercad. There I added a further double skin with connecting internal blocks so that it would be rigid without any need to skin inside with GRP or further reinforcement etc. Once assembled the structure is very strong with no flex at all and is still quite light. This is great way to avoid building the complex curves in wood and will last a very long time. As the original sections were very large, I also split them up so that they would easily fit on my CR10’s 300 x 300 x 400mm bed. Some further simple cuts on some of the taller sections would get them to fit on smaller machines such as an Ender.
All the 16 sections have been pre-orientated for printing and only two sections need any form of support, which saves a huge amount of material and build time. The two parts that do need support, only need a small amount of tree support on one side which just snaps off with no difficulty. Even if this is your first print you will find this a very easy project, although you will need to be patient as it’s a lot of printing. If you are confident in your printer, then some parts can be grouped on the same build plate, but it doesn't really save a huge amount of time to do so and risks losing two parts if something goes wrong. You will need about 8kgs of filament, and it is best buying this in 5kg spools which I hang of the wall. I just google for the cheapest stuff I can find.
I have printed all the parts which have come out perfectly. To join the sections together I welded them with a 30 watt soldering iron rather than glue as it is much stronger. I have carefully split the sections so that joints would be easy to sand, I never bothered sanding the inside as it just looks like metal welding. For bed adhesion I have only been using thinned down white glue, about 5- 10% with water, this works great and have never had a failure. When working through so many parts I would recommend, just going from 1 – 16 printing one at a time. I have numbered the inside surface of the sections to avoid mix ups and added some matching assembly screenshots. I added two wooden rings to the inside of the top and bottom lips which were added before the front and back sections were welded together. I used Tiger seal adhesive between the plastic and wood which is extremely strong. Although the printing of these is really easy, it is a large undertaking so I would suggest you thoroughly study the files and confirm they will all fit on your machine, parts 14 & 12 being the tallest.
Enjoy!
I used the standard setting on Cura with the following overrides –
All parts except 4 & 7
Wall count = 4
Infill = 20%
Support type = none
Adhesion type = Brim
Brim with = 20mm
Parts 4 & 7
Wall count = 4
Infill = 20%
Support type = none
Adhesion type = Brim
Brim with = 20mm
Support type = tree
Support = touching build plate
Support angle = 70degs
I've tried to be as careful as possible but if I have goofed up somewhere let me know asap!
351 downloads
(1 review)0 comments
Updated
-
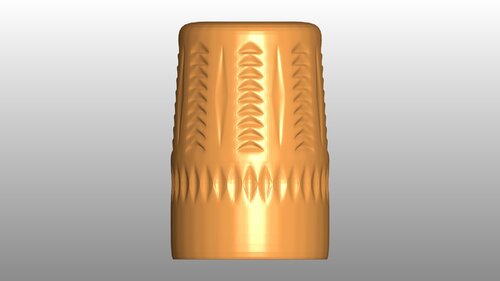
Free
NSD Eye Back
By Mr McGoo
CREATOR's EDIT: My apologies, I only just realised this has 8 rods, not 12 going around the eye. I'll leave the files up for now in case anyone wishes to modify them, as I don't have the time right now. My plan is to sand off the rods printed on the eye, and make/glue the vessel tubing as a separate part so to not bin the one I currently printed. Just wanted to be fully transparent about this mistake!
I created my own CAD files for the NSD eye to print because I wasn't happy with any that I found, they all needed some unsightly supports.
I designed these to be easy print (I did mine on an Ender 3, came out great) The front section doesn't need supports, orientate it so the front section faces up and it'll print nicely. The back section needs a support in the middle to print the stem, which broke off easily for me. Tolerances are pretty tight and will need some light sanding to make it a little looser. Then you just have to drill your holes for your allen bolts and you're good to go!
79 downloads
(0 reviews)0 comments
Updated
-
Free
NSD Eye EMA Parts
By Chris Moliere
These are 3d models of the individual pieces of the NSD's eyeball. They were created using the CAD files in our downloads sections. Do to the small size of some the parts, I would recommend SLA or other forms of resin 3d printing. I also made a version of the VT-400 with the MRH-160Ps attached, in case the parts are too small to print individually. Enjoy!
55 downloads
(0 reviews)0 comments
Submitted
-
Top Downloads
Week
-

Free
-
Free
-

Free
-

Free
-
Free
Month
-
Free
-
Free
-
Free
-
Free
-
Free
Year
-
Free
-
Free
-
Free
-

Free
-
Free
All Time
-
Free
-
Free
-
Free
-

Free
-

Free
-
-
Recent File Reviews
-

Michael56 2
I'm in my late 60's. I live in Australia and have always enjoyed Doctor Who from the very first episode aired here around 1965 when I was 9 years old. Thought how amazing it would be to have a Dalek but had no idea how or where to even begin UNTIL I came across this site. Thanks for giving me the opportunity to at least be able to start on a Dalek build and will detail my progress as it goes along.
-
Mark Sheriff 6
Excellent , looks great and very well designed , well thought out . thank you
-
Marc Harris 54
I'm in my 50s and have since I was a boy watching Dr Who in the 70s always dreamed of making a Dalek for fun, now I have the time and resources, along with your forum's help it's time to live that dream.
I have watched some of the members videos, and I am very impressed with what I have seen.
Long live the Who verse.
I will document my progress and share any innovations I make
-
Chris R 25
Great set of models that printed and fitted together really easily. Can't comment on accuracy as I'm no expert but very happy with the result
-

Dalek Hal 312
Great file, easy to print
-
doctorone 3
Great plan but the pivot does not print as it is not complete like the eye stalk
-


-
Download Statistics
-
Recent File Comments
-

-
By WhosWho · Posted
@RepeatedMemeDid you change something? I haven't touched anything. -
By RepeatedMeme · Posted
@WhosWho @dalekray It's only showing an update because the (written) details were edited. -

-
By life size · Posted
I printed mine in PTEG, 235 nozzle, 60 Bed , no supports and it printed with no mess at all. I ran it at a 40 percent print speed, and the orientation was large cup facing down on my print. -

By John · Posted
See this FAQ topic for more on Downloads availability: -

By ChristmasDalek · Posted
Welcome to the forum! Sorry you have encountered a problem... While waiting for someone who knows more about the downloads section than I do to answer, you may find the explanation in @Johns answer to this thread: Be well, Kathy -
By tardis112 · Posted
Why am I not permitted to download this? -

By Mark Casto · Posted
This is such a useful file for the eye it is perfect for adding a fish tank led inside and looks great thank you. -
By DarthCranium · Posted
ok @Bodule. i apologize if i caused any issue. -

By Bodule · Posted
Hi @DarthCranium Can I suggest that you ask your question in the 3D Printer Discussions section of the forum please? https://www.projectdalek.com/index.php?/forum/209-3d-printer-discussions/ That section itself may be worth a read through, as is @ChristmasDalek's post above yours 👆 here as it may provide additional useful information on how to use the forum. -
By DarthCranium · Posted
What is a good size of 3D printer youd recommend if i wanted to make a dalek of my own? please let me know when able. Thanks -
By Dalek-Nik · Posted
Moflash lenses appear to be slightly difficult these days. the best bet in my opinion is 3D printing them. there are many accurate models here that can be printed on any FDM printer you can find. there is a chance that you can find the lenses online to buy, but those sites can be slightly sketchy. depending on the filament you buy and the printer you have/find, they can be produced fairly accurately. filament can come as cheap as 17 dollars, but do keep in mind that they can some -
By Chris R · Posted
Thanks for uploading these files. Printed really nicely with the odds and sods of filament I had around and very pleased with it, haven't done any tidying up or painting but it looks great as-is.
-
-
Highest Rated Submitters
No ratings this week.
No ratings this month.
-
1
-
2

-
3

-
4
-
5

-
1
-
2

-
3
-
4

-
5
-
-
Current Donation Goals
-
Finance the Forum Hosting 2024Raised £113
-
-
Top Templates
-
Free
-

Free
-
Free
-

Free
-
Free
-