-
Registration
Please register an account to access the Forum topics and features.
An Active Membership subscription gives you access to extra features and exclusive content!
Choosing Active Membership is a great way of supporting the community and showing your appreciation for our resources.
Please note that you need to register BEFORE you can use Facebook, Twitter or Google as a sign in method.
Files For 3D Printing
Files that can be used to for 3D printing physical versions, using your own printer or a service such as Shapeways etc.
Note that files for CNC and laser cutting can be found in their own sub-section, inside.
247 files
-
Free
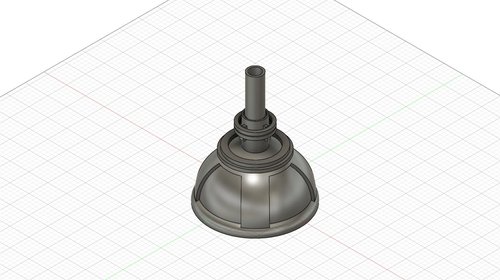
Movie Dalek Domelight Beaker 3D Scan
By audrey2
This is a 3D scan I took off an original beaker from the 60s. The file was then cleaned up, and an interior shape was cut to reasonably match the original.
Can be used to 3D print or carve.
173 downloads
(2 reviews)0 comments
Updated
-
Free
Full Size 3D Printable NSD-like Dalek
By elembivos
Hello all, I hope some of you find this useful, and no one finds it frustrating...
These are the STL files I designed and used to print Duma. You can read all the details here:
I used this project to gain experience both with CAD and 3D printing. Both of which I had no experience with before starting. I started at the top and worked my way down, and you can see how my skills developed a bit as progress was made. There are places where things don't quite match the plans, most notably the NSD dome grooves are missing. I didn't have the skills at the time I did the dome to make that happen. One other thing to note, that you might not notice is the eye stalk is slightly shorter than the plans. This was done intentionally to fit a lamp rod down the center to reinforce it. Straight up 3D printed stalk was not strong enough by itself. Likewise the gun and plunger have lamp rods through them too, but I used long enough rods that they could be trimmed to fit. I took artistic license here and there, for the most part it follows the plans.
If you are thinking of attempting this project you need to know a few things. First, again, I had little to no CAD or 3D printing experience before starting this project. There are probably better models in the downloads section for various parts, but I drew them up myself anyway in an effort to gain experience. So this is the WHOLE thing, designed to fit together. If you substitute someone else's dome, or eye, or whatever, don't expect it to fit without some additional work on your part. Even if you stick strictly to these STL files, not everything is perfect. Read through Duma's diary 5 or 6 times to see where I struggled, and needed to make modifications post print, to make it all work. I think the only file in the bundle that isn't what I used is the Cowl, and there all I did was remove the name from the ID indent, because you probably don't want your Dalek to be named Duma. That said, this project took over 2 years, spanning 2 computers. I did my best to assemble the STL files into one place before uploading them, but be prepared for me to have made a mistake and included one or two files that don't work, or there may be something missing. If someone comes across this, I should be reachable through the forum to figure it out. Second, for the neck and dome you'll need a variety of M3 nuts and bolts. There are many, and I don't recall all the sizes, so have a variety on hand. The skirt and base are held together with a variety of M5 nuts and bolts. Currently the neck is glued and screwed, everything else is just screwed. Eventually it will be glued, but for the moment it seems to hold together pretty well with just nuts and bolts. In the beginning I was printing the parts with threads in the part. Which works ok, but isn't super robust. Eventually I learned how to embed nuts in the parts, so the lower parts don't have that. Third, the dome was designed with animatronics in mind. So there are motor mounts for the eye, and rotation. The motors are described in the build diary, but if you can't get hold of the same part, you will likely need to make some significant modifications. I haven't included anything for motorization in the shoulder or base, so it is currently a static prop. Eventually I'll work out those details. If you get to it before me I'd be happy to bundle your efforts in here. Lastly, I had no CAD or 3D printing experience when I started, so don't judge me 😉.
P.S. Someday I plan to update the files to include "what I would do if I had it to do over again." But don't hold your breath.
569 downloads
-
Free
NSD Gunbox Detail
By Macropod80
I've done this in two layers to make the flat faces easier to sand (before sticking them together). I had trouble getting them to stay flat while printing, so ended up having to print them in halves to prevent lifting. I'd recommend painting them on both sides before screwing them on, to ensure they don't start curling up at the corners as time passes. I've noticed that's happened to some of the BBC Daleks.
306 downloads
(1 review)0 comments
Submitted
-
Free
NSD Cowl Quadrants
By Pgordon
This is the NSD Cowl 1.0.0 By Macropod80, but split into 4 roughly equal sized quadrants which can be printed on printers with a much smaller build area. I created these splits for my Flashforge Adventurer 3 which only has 150x150x150 build area, and they print fine, and join together pretty well with nice tight seams. Someone more proficient at 3D modelling than I could perhaps improve these models by adding some alignment/reinforcing tabs along the joins to aid with accurate assembly and strengthen the joins in the assembled piece. In my case I joined the pieces with superglue and held them together by hand while the initial bond formed.
Whilst the seams are fairly tight & neat, they're not invisible, so the completed assembled cowl will still need filling, sanding & painting. The parts need to be printed with supports, which are not in these model files, you'll have to add them in your slicer.
I printed these in PLA with 0.2 layer height, and each quadrant is roughly a 16 hour print at the highest quality on my machine.
Hope this helps someone!
238 downloads
-
Free
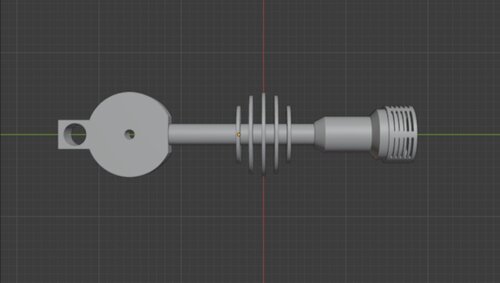
Mk 3 Dalek Eyestalk - for my uploaded eye STL's.
By ansonjames
Eyestalk for my uploaded eye STL's.
Print Eye stalk bottom and eye pivot in the orientation it's presented in WITH supports, at least 20% infill and three perimeters is good.
No supports required for eye stalk top, it's been tested with the properly sized transparent acrylic tube which fits perfectly and has no play.
No glue required, just an M10 thread bar with two nuts for top and bottom.
Fire me a PM if you have an questions!
118 downloads
(1 review)0 comments
Updated
-
Free
NSD Eye Front
By Mr McGoo
I created my own CAD files for the NSD eye to print because I wasn't happy with any that I found, they all needed some unsightly supports.
I designed these to be easy print (I did mine on an Ender 3, came out great) The front section doesn't need supports, orientate it so the front section faces up and it'll print nicely. The back section needs a support in the middle to print the stem, which broke off easily for me. Tolerances are pretty tight and will need some light sanding to make it a little looser. Then you just have to drill your holes for your allen bolts and you're good to go!
106 downloads
(1 review)0 comments
Submitted
-
Free
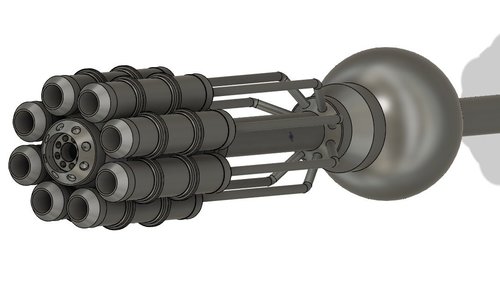
"Eve of the Daleks" Gatling Gun for NSD. Full Size, Rotating
By threegringos
This is the NSD "Gatling Gun" weapon as seen on the trailers for the 2022 New Year's episode "Eve of the Daleks".
This 3D model was made before the episode aired, so the scren shots were very limited. It looks accurate to my eye, however more details may become apparent once we get to see the entire episode.
I used Fusion360 to create this model. It's split into multiple parts for ease of printing.
You will need to provide a 25.4mm (1 inch) diameter pipe for the arm, and also mount a suitable 102mm (4 inch) ball-joint. I always use magic 8-ball toys for my ball joint.
The eight small pipes coming out of the rear of the gun part are 6mm diameter. You can either print them from my files, or optionally use stainless steel drinking straws, cut to length.
I did include an internal gear in the main body of the gun, and an additional pinion gear in case somebody wants to motorize the rotation of the weapon. I haven't had time to figure that out yet.
127 downloads
-
Free
NSD Plunger EMA Parts
By DalekDucky
There are lots of great NSD plungers in the PDF, this ZIP file is of all the various EMA parts pre cut to build your own Plunger.
This also allows you to decide if you want the two "cuts" on the plunger to be aligned or not.
Modifications are:
added a groove in VHH-450 tp allow to center VX-225, added grooves in VHD-475 to center VHH-450 with minimal filler Added small cut at top of VHH-425 for more surface when affixing VT-32 Optional, created a spacer to place between the two VX-40 Optional, insert for the arm to help affix to your arm
You will need to print 4x KW-12 and 2x VX-40
Of possible use, As I am still calibrating my printer, to make the sanding easier, I Printed
VHH-400 and VHH-425 so the inside would be facing up to make sanding from support easier, and KW-12 were flat
Enjoy and Happy Building
101 downloads
(1 review)0 comments
Updated
-
.thumb.png.da17fe0bc84834e71bb4ac8d57a579f8.png)
Free
Dalek Gatling Gun
By RattyVulcan
These files allow you to build a version of the Gatling Gun which includes integrated pistol grip and a housing for a motor and electronics to replicate the lights and spinning effect of a 'real' gatling gun as it slows due to friction.
More details can be found here:
313 downloads
(1 review)0 comments
Submitted
-
Free
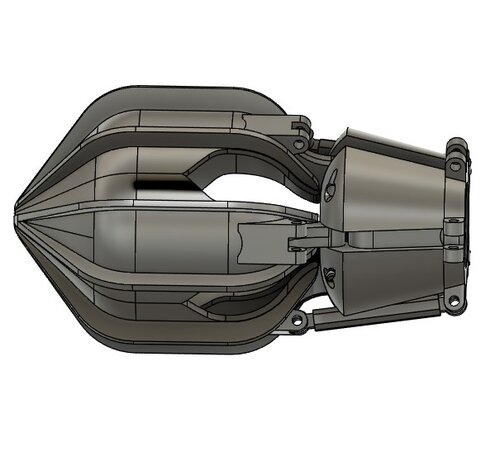
NSD 'Death-Squad' Dalek claw - "Revolution of the Daleks". Fully operational
By threegringos
This is my NSD 'Death Squad' claw as seen on the Daleks in the 2021 New Year's special "Revolution of the Daleks".
I made this originally for my own Dalek, (Dalek Axel). I've been constantly getting messages through my Instagram from people who want a claw, so I thought I'd release it here on Project Dalek for the community to use.
This 3D model was developed solely from screenshots and promotional images. It looks accurate to my eye, and some deliberate (but small) compromises were made to simplify the 3D printing process.
I used Fusion360 to create this model. The claw is split into multiple parts for ease of printing.
The ZIP file contains photos and instructions.
NOTE:
For assembly, you will need some 3mm diameter stainless steel rods or dowels for pivots. I bought a pack from Amazon, and cut them down to size.
You will need to provide your own arm (and Dalek) to mount the claw onto. The claw will fit a 25.4mm (1 inch) diameter pipe.
Enjoy!
77 downloads
(1 review)0 comments
Submitted
-
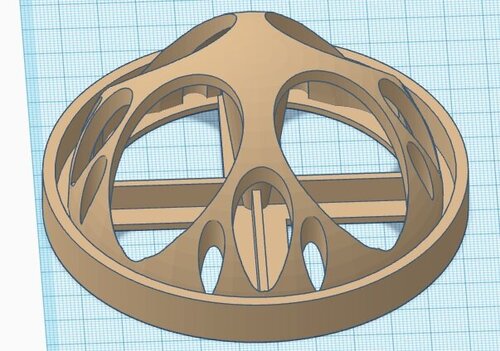
Free
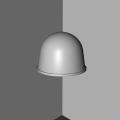
Mark 3 Dome stl files for lazy susan bearing ring
By Adam Gready
This is my attempt at a Mark 3 dome with a shelf designed in for a lazy susan bearing ring. I have 3d printed and assembled this but i haven't actually assembled the dome using the bearing ring so I can't guarantee it is exactly what you are looking for. The files include the complete dome, the dome cut into quarters with the lower brim separated into 1/8ths. Also included is a gluing jig for aligning the brim pieces which seemed to work quite well. The dome quarters wont fit on a 200x200 bed sorry. I have struggled to slice it up finer as Tinkercad was struggling with my request. It can be cut easily enough using meshmixer and if you slice the top of the dome off you can get 1/8th size pieces smaller enough to fit on a smaller bed. Please note all files are at 1/10th scale so make sure you increase by 1000% in your slicer!
97 downloads
(1 review)0 comments
Submitted
-
Free
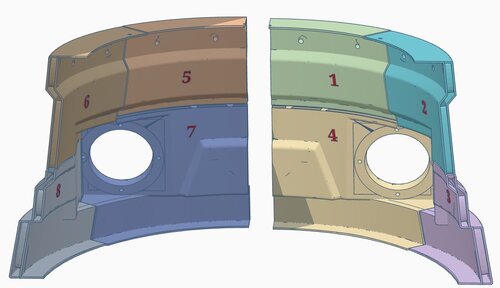
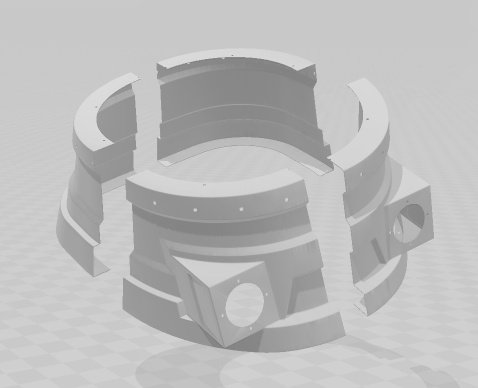
NSD double walled shoulders in 16 easy parts for 300 x 300 x 400 printers
By Prefect1938
Hello,
Please find the STL files for my 2005 Dalek’s shoulders. I took the original model shell from daviddz and put it into Tinkercad. There I added a further double skin with connecting internal blocks so that it would be rigid without any need to skin inside with GRP or further reinforcement etc. Once assembled the structure is very strong with no flex at all and is still quite light. This is great way to avoid building the complex curves in wood and will last a very long time. As the original sections were very large, I also split them up so that they would easily fit on my CR10’s 300 x 300 x 400mm bed. Some further simple cuts on some of the taller sections would get them to fit on smaller machines such as an Ender.
All the 16 sections have been pre-orientated for printing and only two sections need any form of support, which saves a huge amount of material and build time. The two parts that do need support, only need a small amount of tree support on one side which just snaps off with no difficulty. Even if this is your first print you will find this a very easy project, although you will need to be patient as it’s a lot of printing. If you are confident in your printer, then some parts can be grouped on the same build plate, but it doesn't really save a huge amount of time to do so and risks losing two parts if something goes wrong. You will need about 8kgs of filament, and it is best buying this in 5kg spools which I hang of the wall. I just google for the cheapest stuff I can find.
I have printed all the parts which have come out perfectly. To join the sections together I welded them with a 30 watt soldering iron rather than glue as it is much stronger. I have carefully split the sections so that joints would be easy to sand, I never bothered sanding the inside as it just looks like metal welding. For bed adhesion I have only been using thinned down white glue, about 5- 10% with water, this works great and have never had a failure. When working through so many parts I would recommend, just going from 1 – 16 printing one at a time. I have numbered the inside surface of the sections to avoid mix ups and added some matching assembly screenshots. I added two wooden rings to the inside of the top and bottom lips which were added before the front and back sections were welded together. I used Tiger seal adhesive between the plastic and wood which is extremely strong. Although the printing of these is really easy, it is a large undertaking so I would suggest you thoroughly study the files and confirm they will all fit on your machine, parts 14 & 12 being the tallest.
Enjoy!
I used the standard setting on Cura with the following overrides –
All parts except 4 & 7
Wall count = 4
Infill = 20%
Support type = none
Adhesion type = Brim
Brim with = 20mm
Parts 4 & 7
Wall count = 4
Infill = 20%
Support type = none
Adhesion type = Brim
Brim with = 20mm
Support type = tree
Support = touching build plate
Support angle = 70degs
I've tried to be as careful as possible but if I have goofed up somewhere let me know asap!
351 downloads
(1 review)0 comments
Updated
-
Free
Vacuum chuck
By Simchet
Vacuum chuck for holding 100mm stainless steel spheres for drilling 25mm diameter holes to make weapon ball joints. Note - chuck is specific for bed on Bosch PBD40 pillar drill. There’s a boss in the bottom that locates in the 20mm diameter hole in the centre of the bed. This ensures the apex of the sphere is under the centre of the drill bit. The bolt holes also align with the T nut slots on the Bosh drill. That’s the only thing that makes it drill specific.
You need to add a strip of compliant material (rubber/draught excluder strip etc) to top inner surface of chuck to provide an air tight seal. Plug in a vacuum cleaner into the side port and it pulls the sphere into the chuck holding it securely. A strip of tape round the equator of the sphere helps increase friction to resist torque from the hole saw. Chuck must be fixed securely to base of pillar drill.
Chuck is specific for 25mm diameter hole saws as to drill the second hole you insert a short length of 25mm tube in the first hole that locates in a counter bore (25mm diameter) in the bottom of the Chuck. This ensures the two holes are aligned. You need to seal the bottom as the vacuum will be lost when the hole saw breaks through on the 2nd hole. Ring of hot melt glue between the stub of tube and the sphere works. Another ring of draught excluder seal in the bottom of the chuck would also work. If you do this keep the diameter of it as small as possible as you’re reducing the area that air pressure has to work on.
If you don’t understand all of above and how vacuum chucks work, you shouldn’t be using the chuck. Take usual precautions when operating powered tools, I.e guards and PPE. Also note that stainless steel spheres are work hardened, use a hole saw with high speed steel teeth and run at a low speed and low feed rate. If work piece starts rotating, vibrating or spinning, stop immediately.
STL file and original CAD geometry files. CAD is in RS Design Spark Mechanical format (free). I suspect if you change the extension to .sdoc it will open in Ansys Spaceclaim as it’s basically the same software. Sorry, can’t export in parasolid/STEP with the free version of DesignSpark Mechanical.
4 downloads
(1 review)0 comments
Submitted
-
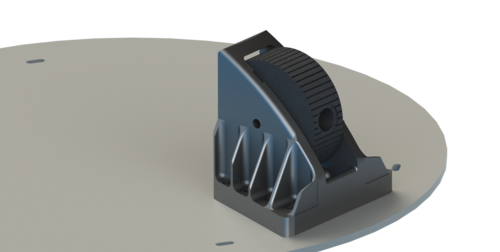
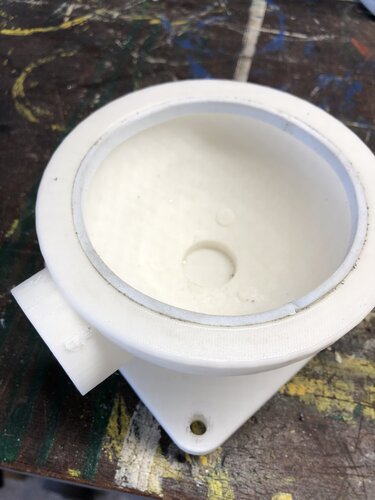
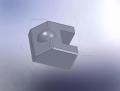
Free
NSD eye pivot holder
By cjorgensenmd
Designed to hold my 3d printed NSD eye pivot and support the interior dome. The base is as thick as it is because I needed the extra height to get the eyestalk where it needed to be from my rotating base. The little horizontal rod on the lower side of this piece is itended to be used to attach a spring to counterbalance the weight of the whole eye.
547 downloads
-
Free
-
Free
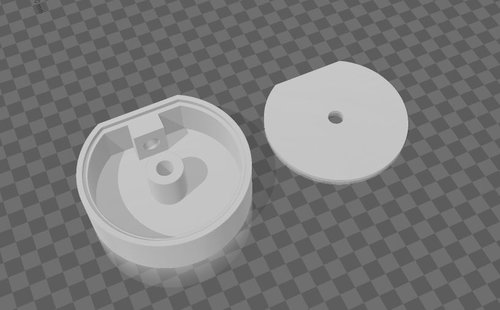
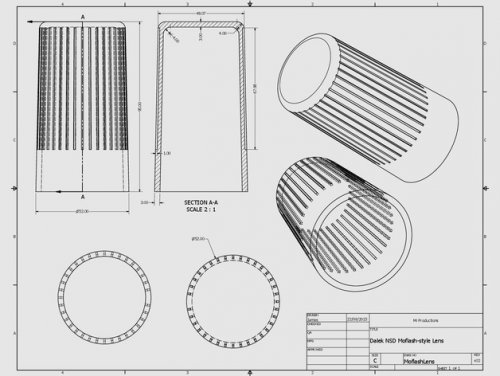
NSD Moflash lens
By cdngoose
I truly believe the 3D printer is a Dalek builders best friend. Since the Moflash Lens is no longer available we can now print one. I used this file from Thingverse and it is quite acceptable. Below is the caveat for its use.
A close approximation of the Moflash lenses used for Dalek NSD dome lights. I do not have a real one, so attempted this for my own NSD.
Dimensioned to fit inside the housings described in the Project Dalek NSD plans.
Print in a transparent or semi-transparent material as desired.
Dalek NSD Moflash-style Dome Light Lens by miproductions is licensed under the Creative Commons - Attribution - Non-Commercial license.
So what's this mean?
Remixing or Changing this Thing is allowed.
Commercial use is not allowed.
Once again I did not create this file but I have used it and it needs to be available to PDF members.
cdngoose
Note: Above are the pictures I took during and after printing, first one is nearing the end of print and the second is print finished. The third one is with the filler removed while the last one is with a flashlight with weak batteries. all in all I prefer this look over the original Moflash unit, I like the silver finish and it glows nicely.. Once the light hits it their is an oddness about the silver glow that makes it far more Dalek worthy!
Enjoy, and with the discontinued production of these lenses take heart that we will have them forever now! Gone are the days of scrounging and pleading in back corners for obscure parts to make our obsession!
cdngoose
319 downloads
(1 review)0 comments
Updated
-
Free
NSD Shoudlers STL
By daviddz
This is just the Shoulder section of the Solid works NSD 1.0.0 by cjorgensenmd
I took the fiberglass NSD shoulder.SLDPRT file, and used Grab CAD to convert it to an STL file since I don't have Solidworks.
I then used Mesh Mixer to cut it in to quarters that would fit on my CR-10 Max printer.
NOTE: I have not tried printing this (Yet), though all files are water tight, and Should print OK.
302 downloads
(1 review)0 comments
Updated
-
Free
Planet Supreme Dalek: Eye Stalk
By Necrosis
This is a download for the Planet Supreme Dalek eye stalk. The files are in .stl format making them easy to 3D print or to use as digital references/models. These parts are 1:1 scale and match the most recent revision of the Planet Supreme Dalek plans making it plug and play to print or easy to scale to your Daleks needs. I personally 3D printed these units in colored SLA giving a refined finished look. Recommend printing these parts slow and precise at 15% infill for best results with standard 3D printers. Torch light files are based on "Sparky_Butane's" file and cross referenced with the Planet Supreme Dalek build plans as well as adapted for use with other included files.
(Would love to see any print results from anyone who chooses to share on this thread)
Details:
Scale - 1:1 (In compliance with Planet Supreme Dalek Plans Version 3.2)
Parts included in this download - Eye Stalk * Eye/Torch Piece * 3 Stalk Discs * Eye Pivot
NOTE: For ease of assembly, parts have a 0.5mm to 1mm tolerance. The eye Pivot has a 12mm (1/2") hole in the center for a bolt and a larger hole on the backside that can be used to attach a control rod for the eye stalk.
I will keep these files up to date and if you have any suggestions or find any errors please let me know so that I may update the parts.
20 downloads
-
Free
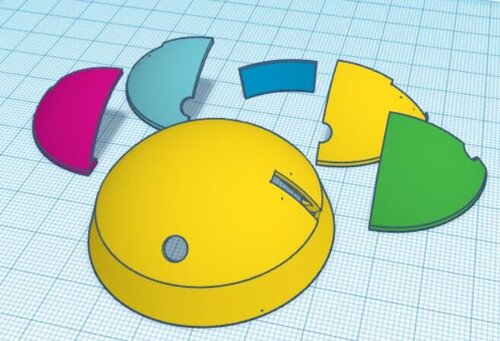
NSD Hemisphere mounting
By Prefect1938
Hello,
Hope you are all doing well. Please find attached my mounting for the hemispheres, like others I went for the 100mm bobbles which are nice but not very robust. To overcome this a bit and also help mount them I designed this mounting which incorporates a backing for the bobble so that it can be glued to it and therefor strengthening it considerably. It's so strong in fact that I can stand on it with my full Dad weight without it crushing, and yet it only weighs 41g! I have incorporated a hole though it so that a 5mm bolt or threaded rod can be simply screwed in to mount it to the skirt. It requires no supports, no brim and only 5% infill. I can print 4 at a time in 24hrs, increasing the printer speed to 120%. If you print it in black there is no further finishing required other than to fit your painted half bobble. I suggest printing one as a test to check it is a good match for your bobbles and if not a slight % change should be enough. A good test is to put a little blue-tack on the frame and to check that it is well squished when fitting the bobble. Please note the following Cura Standard setting over rides -
Wall line count - 2
Top layers - 4
Bottom layers - 8
Infill density - 5%
Infill pattern - Triangles
Support - None
Build adhesion - None
Any questions or comments very welcome.
Thanks, Scott.
11 downloads
(1 review)0 comments
Updated
-
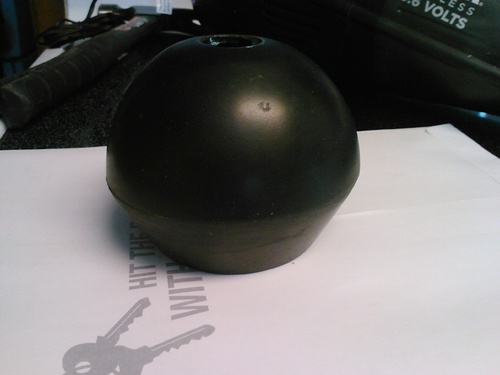
Free
Shawcraft Eye V2
By cdngoose
This file is for the Shawcraft version of the Eye and is Version 2 already, I normally install the eye on a 3/4 inch ABS threaded tube so version 1 has an opening to accept that setup. However, everyone has a different way of installing the eye to the eyestalk and I had this file altered to allow the builder a choice of what size hole they need. Though this file does have a pilot hole which is centered for you already. The picture you see is the Eye I do have installed on Nyder and I will only use this file from now on when I'm making a Shawcraft Dalek! No more magic 8 ball and a can of tomato soup with 10 pounds of Bondo!
Once again I need to Thank Philip McNulty for all his efforts in drawing up these parts for me and for all PDF members.
Their are two inserts for this Eye which will cover most years of Shawcraft Daleks included in this download.
Cdngoose.
257 downloads
(1 review)0 comments
Updated
-
Free
1960s Egg Cup
By monkeytennis
This model comprises a 1960s egg cup model used on the Daleks between The Chase and The Evil of the Daleks.
I own a set of original egg cups and this model was made using measurements from the actual item.
It's in OBJ format. There is a second object in the file. This is a cube of precisely one meter in all dimensions. This is an aid for scaling if necessary.
51 downloads
-
Free
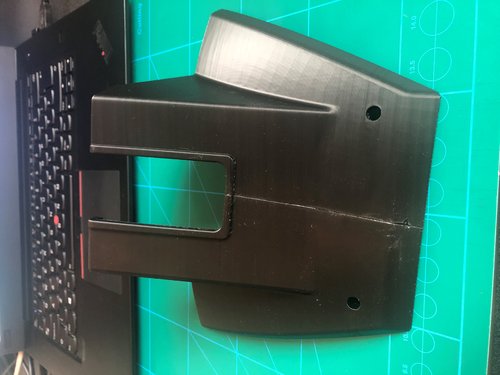
Neck Block Detail
By hallam
NSD Neck Block Detail as STL file suitable for digital printing.
The inside of the neck block is hollowed out to minimize use of material. Wall thickness is 1mm.
127 downloads
(0 reviews)0 comments
Submitted
-
Free
Gun Box Detail
By hallam
NSD Gun Box Detail as STL file.
Back of the piece is hollowed out to minimize use of material. Wall thickness is 1 mm. I paid $25 for printing and after sanding and filling, glued the result to a piece of acrylic to give it a flat base to make moulding easier.
117 downloads
(0 reviews)0 comments
Submitted
-
Free
TrainWreck's NSD Skirt Hemisphere
By TrainWreck
Couldn't get the other hemesphere files on here to open for me so I modeled my own.
I based the scale off of the NSD design booklet.
Any feedback is welcome!
88 downloads
(0 reviews)0 comments
Updated
-
Free
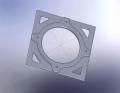
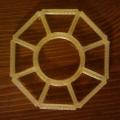
Dead Planet Octagon
By Ferrain
Quick Sketchup generated file for the octagonal supports of a Dead Planet Dalek Gun.
Dimensions taken from PDF Plans for 3mm gun gods, gun barrel hole slightly oversized after first print, thickness 2.5mm.
16mins print time on medium quality 15% infill
No further versions planned, just done for proof of concept.
93 downloads
(0 reviews)0 comments
Updated
-
Top Downloads
Week
-

Free
-
Free
-

Free
-
Free
-

Free
Month
-
Free
-
Free
-
Free
-
Free
-
Free
Year
-
Free
-
Free
-
Free
-

Free
-
Free
All Time
-
Free
-
Free
-
Free
-

Free
-
Free
-
-
Recent File Reviews
-

Michael56 2
I'm in my late 60's. I live in Australia and have always enjoyed Doctor Who from the very first episode aired here around 1965 when I was 9 years old. Thought how amazing it would be to have a Dalek but had no idea how or where to even begin UNTIL I came across this site. Thanks for giving me the opportunity to at least be able to start on a Dalek build and will detail my progress as it goes along.
-
Mark Sheriff 6
Excellent , looks great and very well designed , well thought out . thank you
-
Marc Harris 54
I'm in my 50s and have since I was a boy watching Dr Who in the 70s always dreamed of making a Dalek for fun, now I have the time and resources, along with your forum's help it's time to live that dream.
I have watched some of the members videos, and I am very impressed with what I have seen.
Long live the Who verse.
I will document my progress and share any innovations I make
-
Chris R 25
Great set of models that printed and fitted together really easily. Can't comment on accuracy as I'm no expert but very happy with the result
-

Dalek Hal 312
Great file, easy to print
-
doctorone 3
Great plan but the pivot does not print as it is not complete like the eye stalk
-


-
Download Statistics
-
Recent File Comments
-

-
By WhosWho · Posted
@RepeatedMemeDid you change something? I haven't touched anything. -
By RepeatedMeme · Posted
@WhosWho @dalekray It's only showing an update because the (written) details were edited. -

-
By life size · Posted
I printed mine in PTEG, 235 nozzle, 60 Bed , no supports and it printed with no mess at all. I ran it at a 40 percent print speed, and the orientation was large cup facing down on my print. -

By John · Posted
See this FAQ topic for more on Downloads availability: -
By ChristmasDalek · Posted
Welcome to the forum! Sorry you have encountered a problem... While waiting for someone who knows more about the downloads section than I do to answer, you may find the explanation in @Johns answer to this thread: Be well, Kathy -
By tardis112 · Posted
Why am I not permitted to download this? -

By Mark Casto · Posted
This is such a useful file for the eye it is perfect for adding a fish tank led inside and looks great thank you. -
By DarthCranium · Posted
ok @Bodule. i apologize if i caused any issue. -
By Bodule · Posted
Hi @DarthCranium Can I suggest that you ask your question in the 3D Printer Discussions section of the forum please? https://www.projectdalek.com/index.php?/forum/209-3d-printer-discussions/ That section itself may be worth a read through, as is @ChristmasDalek's post above yours 👆 here as it may provide additional useful information on how to use the forum. -
By DarthCranium · Posted
What is a good size of 3D printer youd recommend if i wanted to make a dalek of my own? please let me know when able. Thanks -
By Dalek-Nik · Posted
Moflash lenses appear to be slightly difficult these days. the best bet in my opinion is 3D printing them. there are many accurate models here that can be printed on any FDM printer you can find. there is a chance that you can find the lenses online to buy, but those sites can be slightly sketchy. depending on the filament you buy and the printer you have/find, they can be produced fairly accurately. filament can come as cheap as 17 dollars, but do keep in mind that they can some -
By Chris R · Posted
Thanks for uploading these files. Printed really nicely with the odds and sods of filament I had around and very pleased with it, haven't done any tidying up or painting but it looks great as-is.
-
-
Highest Rated Submitters
No ratings this week.
No ratings this month.
-
1
-
2

-
3
-
4
-
5

-
1
-
2

-
3
-
4

-
5
-
-
Current Donation Goals
-
Finance the Forum Hosting 2024Raised £113
-
-
Top Templates
-
Free
-
Free
-
Free
-

Free
-
Free
-